…where east meets west
- Home
- Brief History
- The Greenwich Meridian
- Greenwich
(1675–1958) - Herstmonceux
(1948–1990) - Cambridge
(1990–1998) - Outstations (1822–1971)…
- – Chingford (1822–1924)
- – Deal
(1864–1927) - – Abinger
(1923–1957) - – Bristol & Bradford on Avon
(1939–1948) - – Bath
(1939–1949) - – Hartland
(1955–1967) - – Cape of Good Hope
(1959–1971)
- Administration…
- – Funding
- – Governance
- – Inventories
- – Pay
- – Regulations
- – Royal Warrants
- Contemporary Accounts
- People
- Publications
- Science
- Technology
- Telescopes
- Chronometers
- Clocks & Time
- Board of Longitude
- Libraries & Archives
- Visit
- Search
The Meridian Building
The Meridian Building is the modern name for the range of linked rooms and spaces on the south side of the Observatory Courtyard. It contains the rooms in which the majority of the Observatory’s most important telescopes (the meridian instruments) were housed. It has its origins in Flamsteed’s Observatory of 1675 and Halley’s Quadrant Room of 1725. Over the years, numerous extensions and alterations have been made. The last major remodelling took place in the mid 1960s when the building was converted for its new role as a museum building.
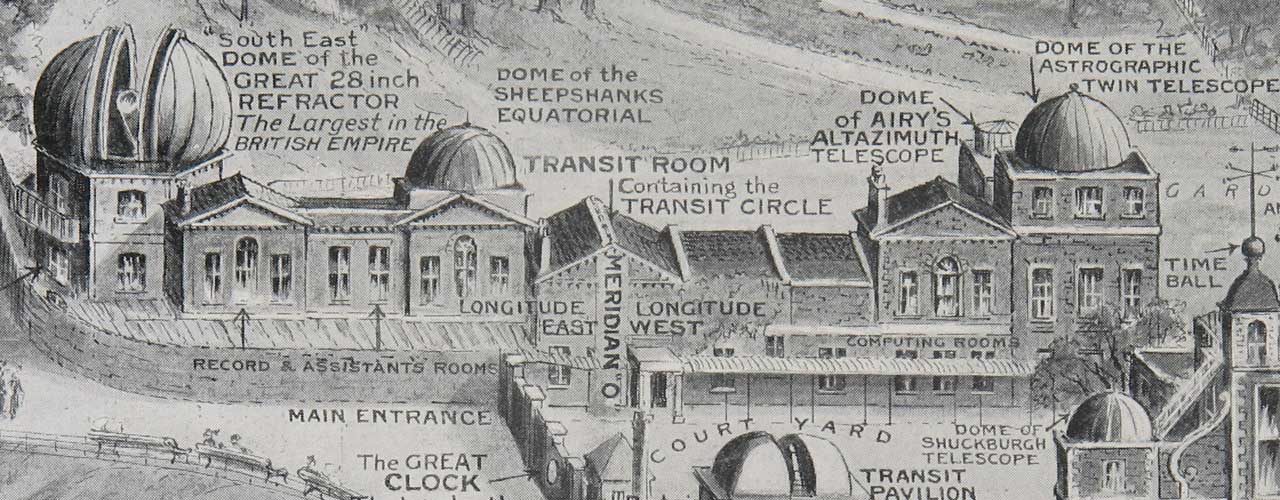
Diagrammatic view of the Meridian Building from the north. Although it may appear to be attached, the South East Dome (Great Equatorial Building) was an entirely separate structure. Detail from a drawing by G F Morrell published in The Graphic on 7 June 1913
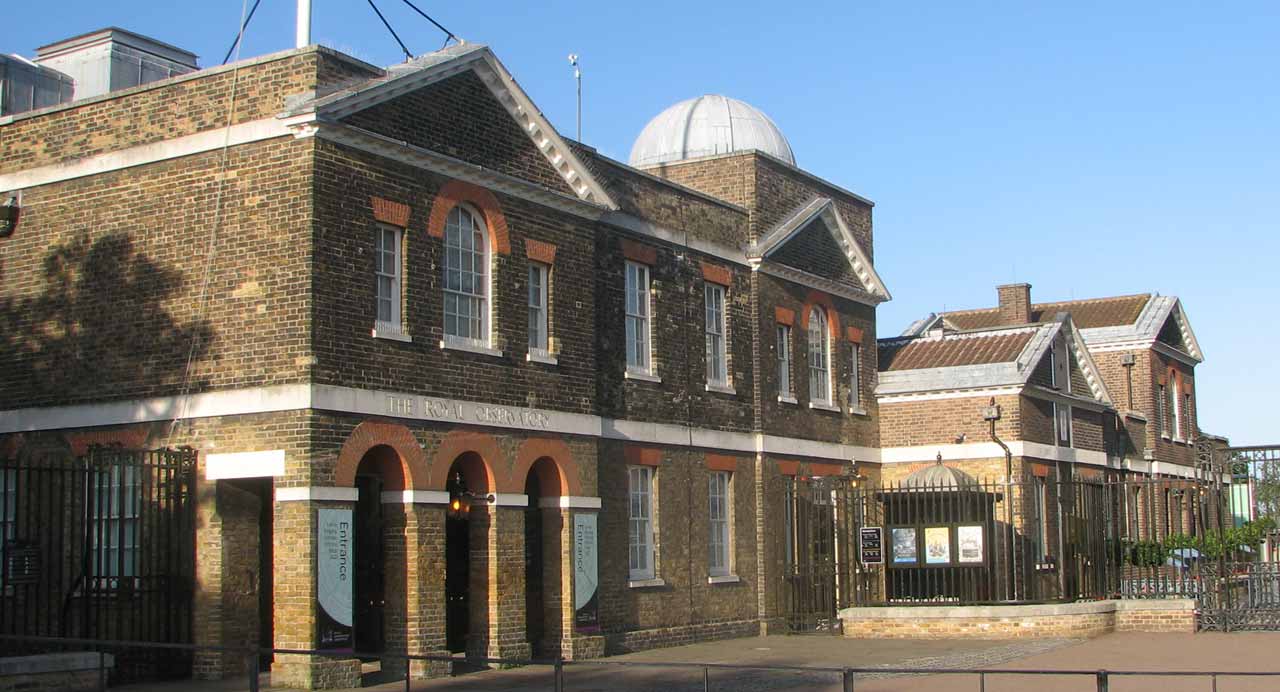
The Meridian Building, August 2014. The domes at the western end were removed in the 1960s
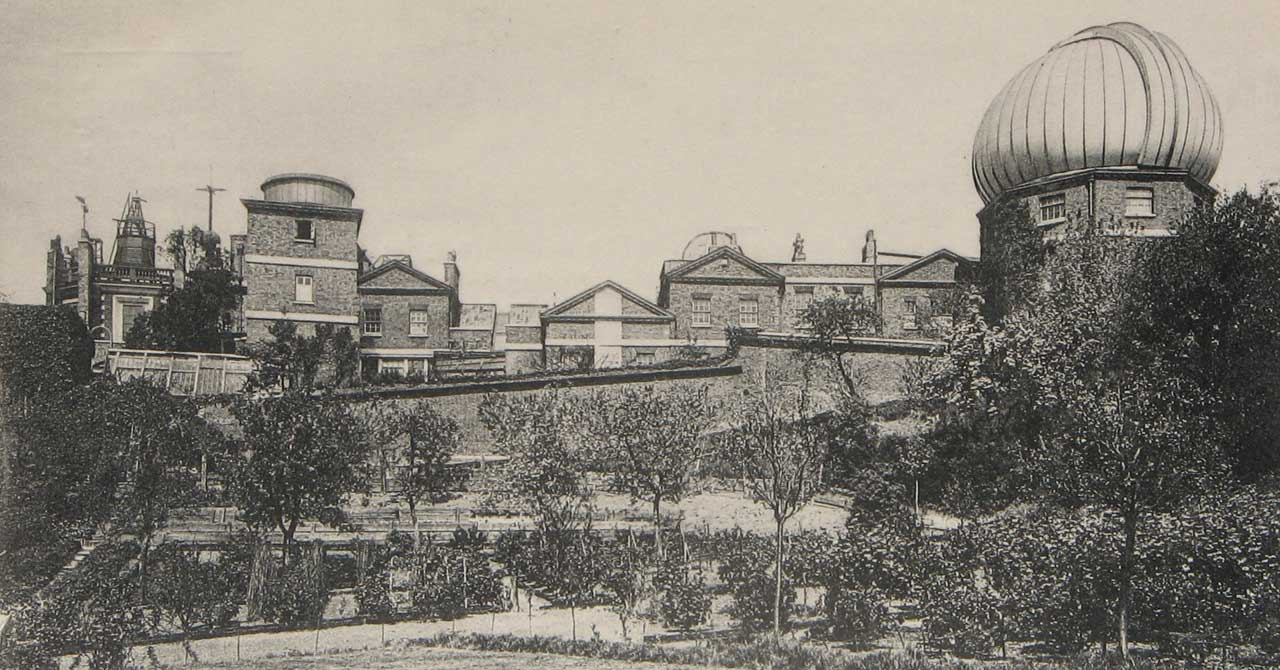
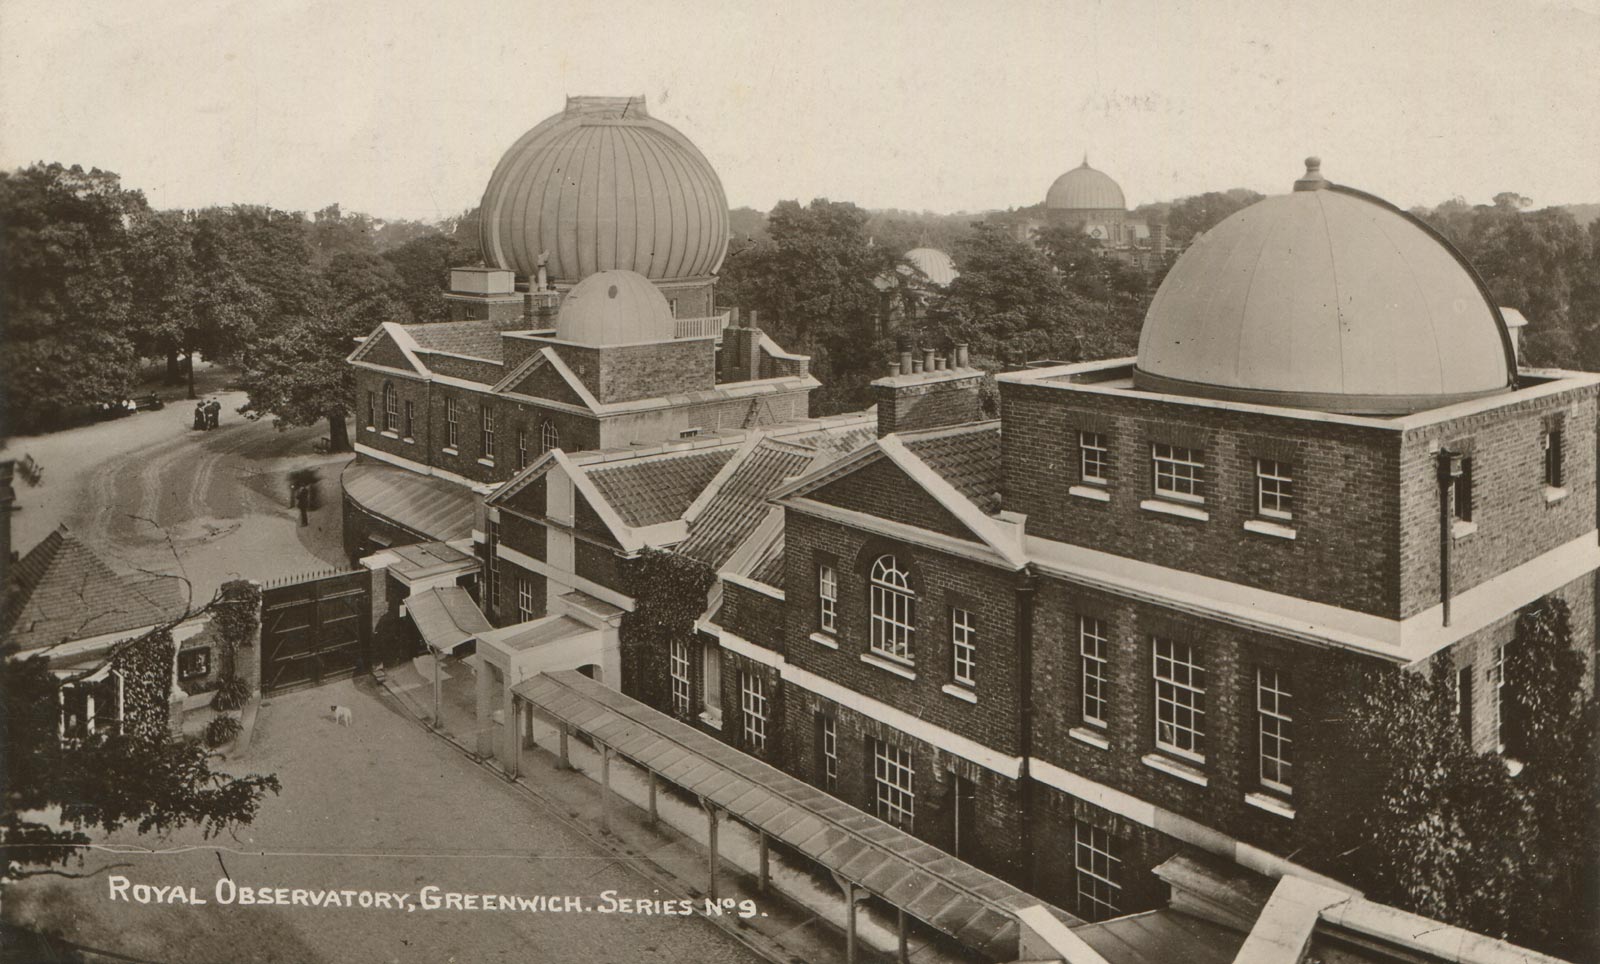
The Meridian Building from the south in about 1895. The South Dome (Altazimuth Dome) is on the left and the Great Equatorial on the right. Detail from a postcard published by Edmund Düsédau
Flamsteed’s Observatory
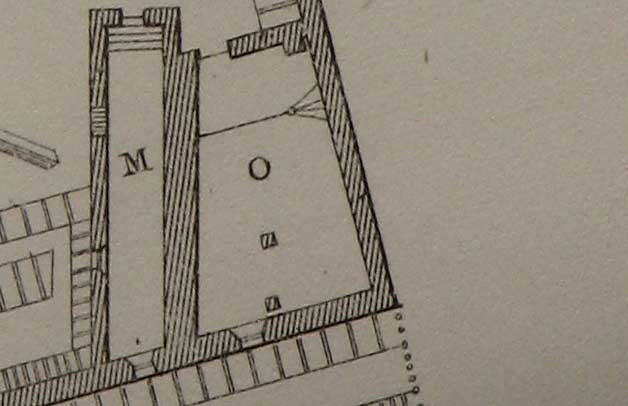
Plan of Flamsteed's Quadrant House (M) and Sextant House (O) c.1676. Redrawn by Airy from an engraving by Francis Place after Robert Thacker and published in the 1862 volume of Greenwich Observations. Hooke's 10 foot Mural Quadrant was mounted on the east wall of the Quadrant House. Flamsteed's later Mural Arc was placed on the thinner west wall
Designed by Christopher Wren, Flamsteed's Observatory consisted of two adjoining rooms, the Sextant House and the Quadrant House. Each had a roof that could be opened to the heavens. The most important part of the building from an historical context is the meridian wall on which Flamsteed mounted his Mural Arc in 1689. Rather than design the Mural Arc to be mounted on the substantial east wall of the Quadrant House, Flamsteed designed it to be mounted on the west one which had originally contained a window. The wall was soon discovered to be suffering from subsidence, caused in part by its location close to the edge of a hill and in part by its shoddy construction. Flamsteed was able to calculate the rate at which it was subsiding from his observations of the stars and correct their observed positions accordingly.

Two internal views of Flamsteed's Sextant House. Engraving by Francis Place after Robert Thacker c.1676 from Volume 3 of Flamsteed's Historia Coelestis Britannica (London, 1725)
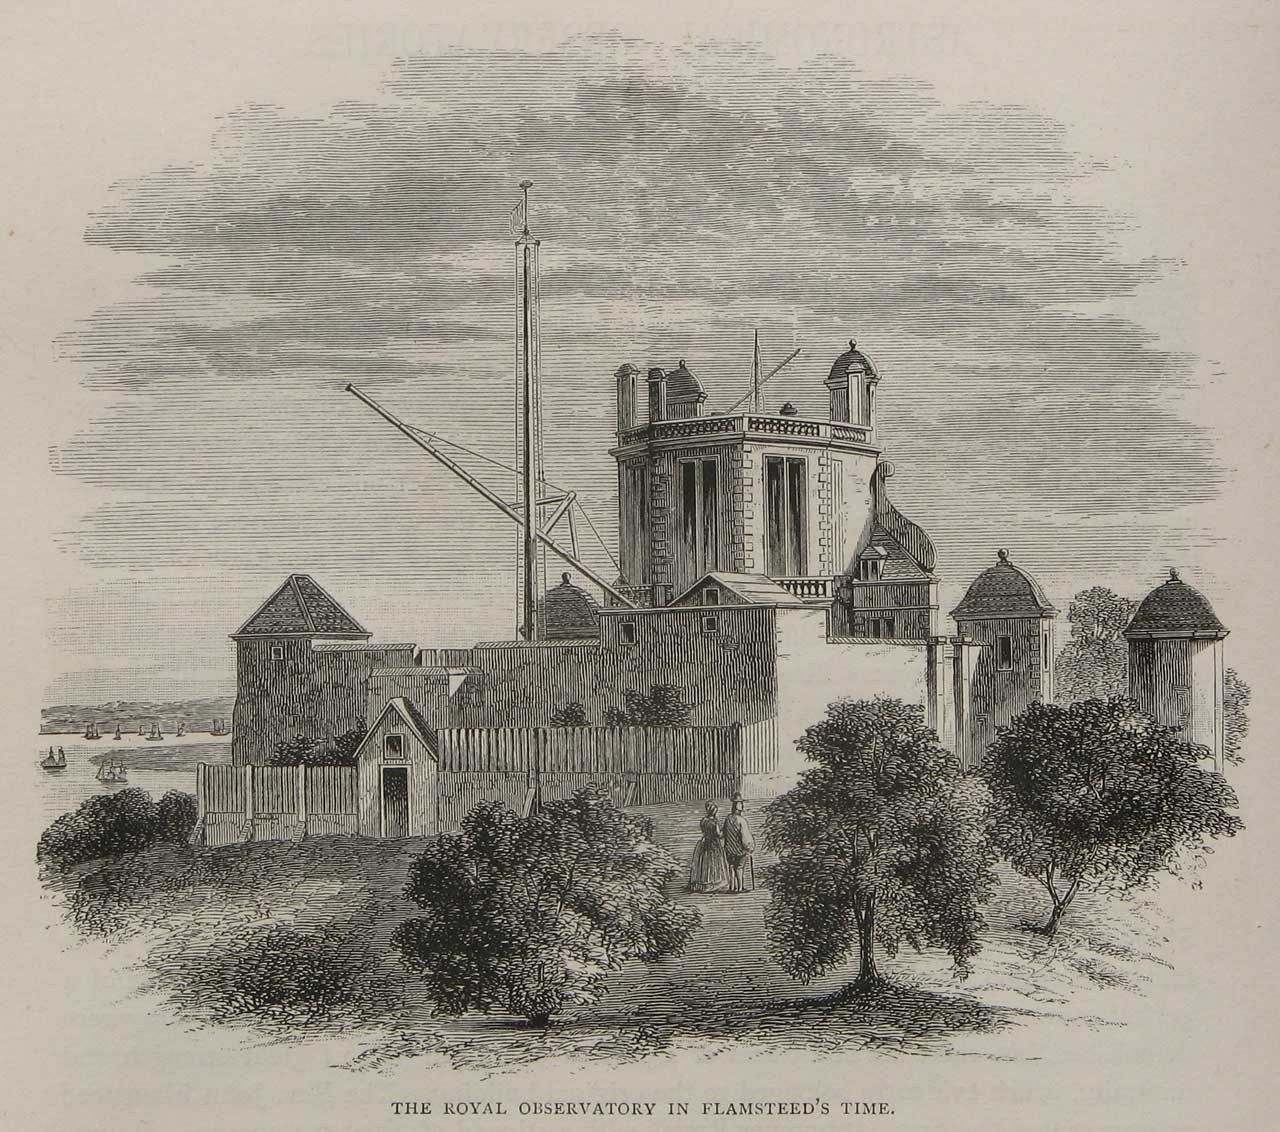
The Royal Observatory in Flamsteed's Time. Redrawn for Dunkin from an engraving by Francis Place after Robert Thacker c.1676 and published in the 1862 volume of The Leisure Hour and in the 1891 edition of The Midnight Sky. Flamsteed's Quadrant and Sextant Houses are in the south-east corner immediately above the two figures
Halley’s Quadrant House
After Flamsteed’s demise, rather than attempting to re-use his meridian wall, Halley had a new freestanding wall erected immediately to its north and about 1.85m to its east, in line with the wall on which the Hooke’s 10 foot Mural Quadrant had been mounted. On this, he erected his new Mural Quadrant. Made from eleven large pieces of stone (a foundation slab with five rows of two stones on top), the wall was positioned in the midle of a newly erected building now referrred to as Halley’s Quadrant House. Although there is no known plan or detailed description of the building, it is believed to have been either square or rectangular in shape with its north-eastern corner breaking though the Observatory’s eastern boundary. This can be seen in the view below.
The Observatory in 1736. On the extreme left, the corner of Halley's Quadrant House can be seen breaking through the boundary wall. Detail from Prospect of Greenwich from the Observatory... . Engraved by St. Torres after J. Rigaud, 1736. Printed for Robert Wilkinson London (No. 58 Cornhill)
Bradley’s New Observatory
Halley’s Quadrant House was demolished by Bradley in 1749/50 to make way for a new and larger building often referred to as the Bradley Observatory or Bradley’s New Observatory. The land on which the new building was erected was largely outside the domain of the original observatory. Orientated due east-west, it was symmetrical in design with a two story central section and a single story wing on either side. It was entered via a pair of double doors on its northern side which opened into a lobby from where the three ground floor rooms were accessed. The room at the west end, incorporated unchanged, the massive stone wall on which Halley’s quadrant had been mounted. The room at the east end housed a new transit telescope. The middle room was the assistant's sitting and calculating room. It was furnished with a small library of such books only as were necessary for his computations, and a clock made by Graham. Immediately over this was his bedroom, with an alarum to awake him to make his observations at the proper time. It was accessed from a stairway in the northeast corner of the sitting room. As originally constructed, the building had hip roofs at either end and roof openings for the main telescopes that descended only as far as the upper sections of the supporting walls. It was also hemmed in by a newly constructed boundary wall, which would have detracted from its appearance when viewed from the park outside.
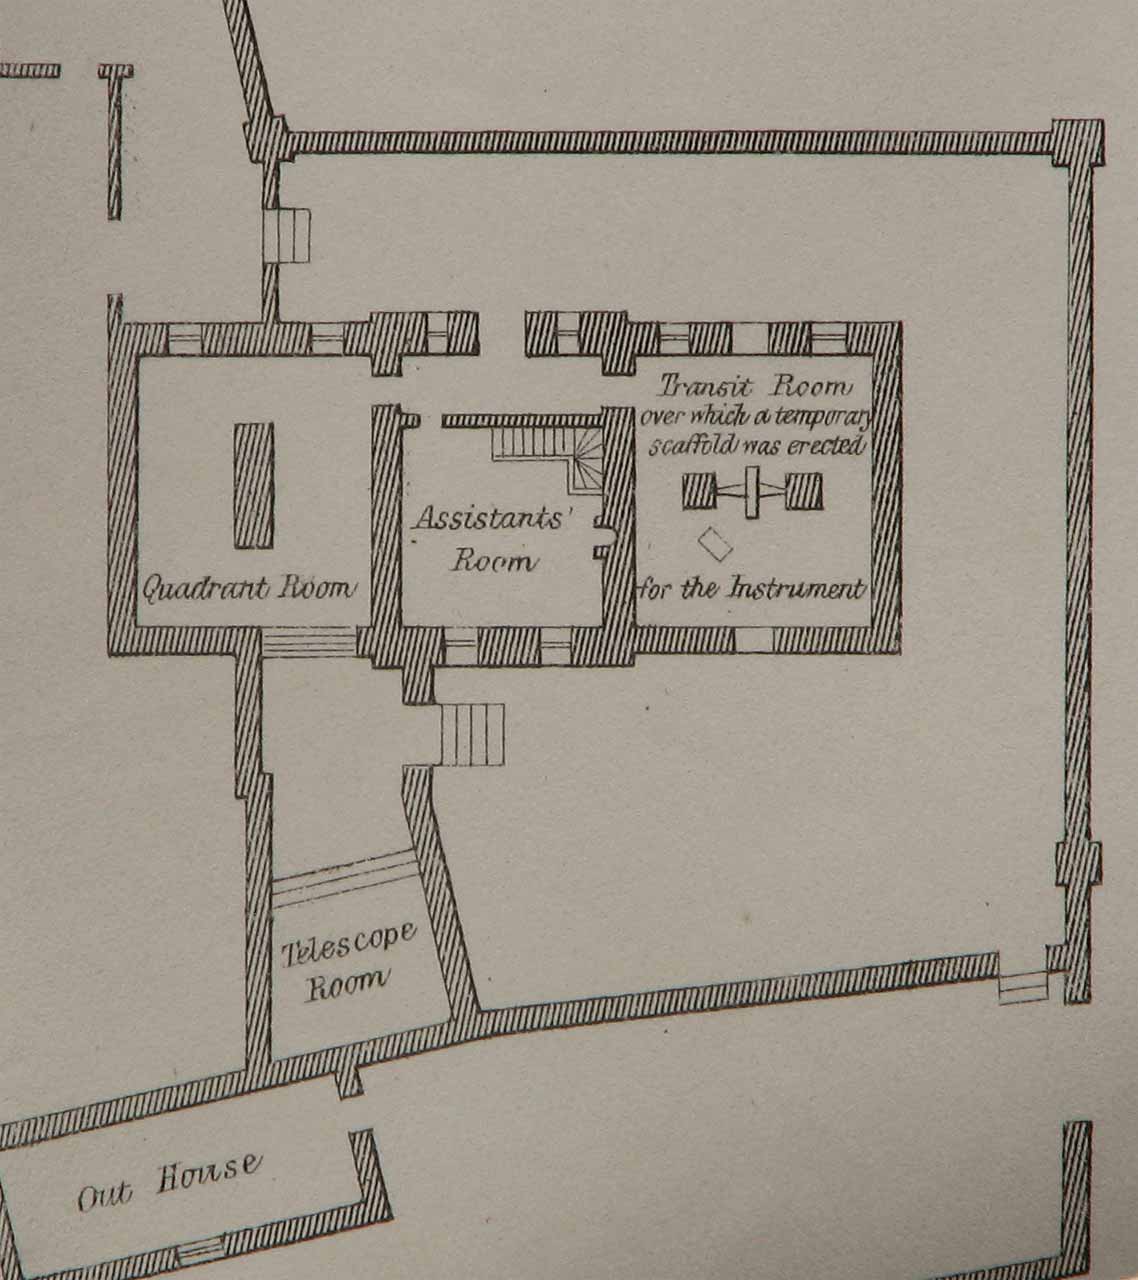
1788 Ground plan of Bradley's New Observatory. Redrawn by Airy from Roy's An Account of the Trigonometrical Operation ... (Phil. Trans. Feb 1790), and published in the 1862 volume of Greenwich Observations. The 'Telescope Room' occupies the site of Flamsteed's Sextant House, Flamsteed's Quadrant House to its left having been pulled down (in part at least) by Halley. The temporary scaffold was erected above the Transit Instrument to enable Roy to mount his theodolite there

Bradley's New Observatory from the north in 1769. The Quadrants occupied the west wing (right) and the Transit Instrument the east wing (left). The 12½-foot zenith sector was normally used in the Quadrant Room under the opening marked S. Whenever its reversal was required, it was dismounted and re-erected beneath the opening marked s in the Transit Room. From Bernoulli Lettres astronomiques ... , (Berlin, 1771)
Extensions for the Mural Circle and new accommodation for the First Assistant
Bradley’s Observatory was extended to the east for Maskelyne in 1808 or 1809 to house a new observing instrument, the mural circle that had been ordered from Troughton. Its footprint was extended twice more in an easterly direction, initially in 1813, (the foundation stone being laid on 8 July (RGO6/1/53)), and then in 1855 when a new fireproof store was built.
The Meridian Building in 1839. The figure in the centre is the Astronomer Royal, George Airy. The two windows immediately to the left of him belong to the Transit Room, the Transit Instrument being located between them. The two Mural Circles were located in the adjoining room to the left. Further to the left is the extension of 1813 with the dome built for the Shuckburgh telescope. From a drawing by Elizabeth Smith, 11 February 1839
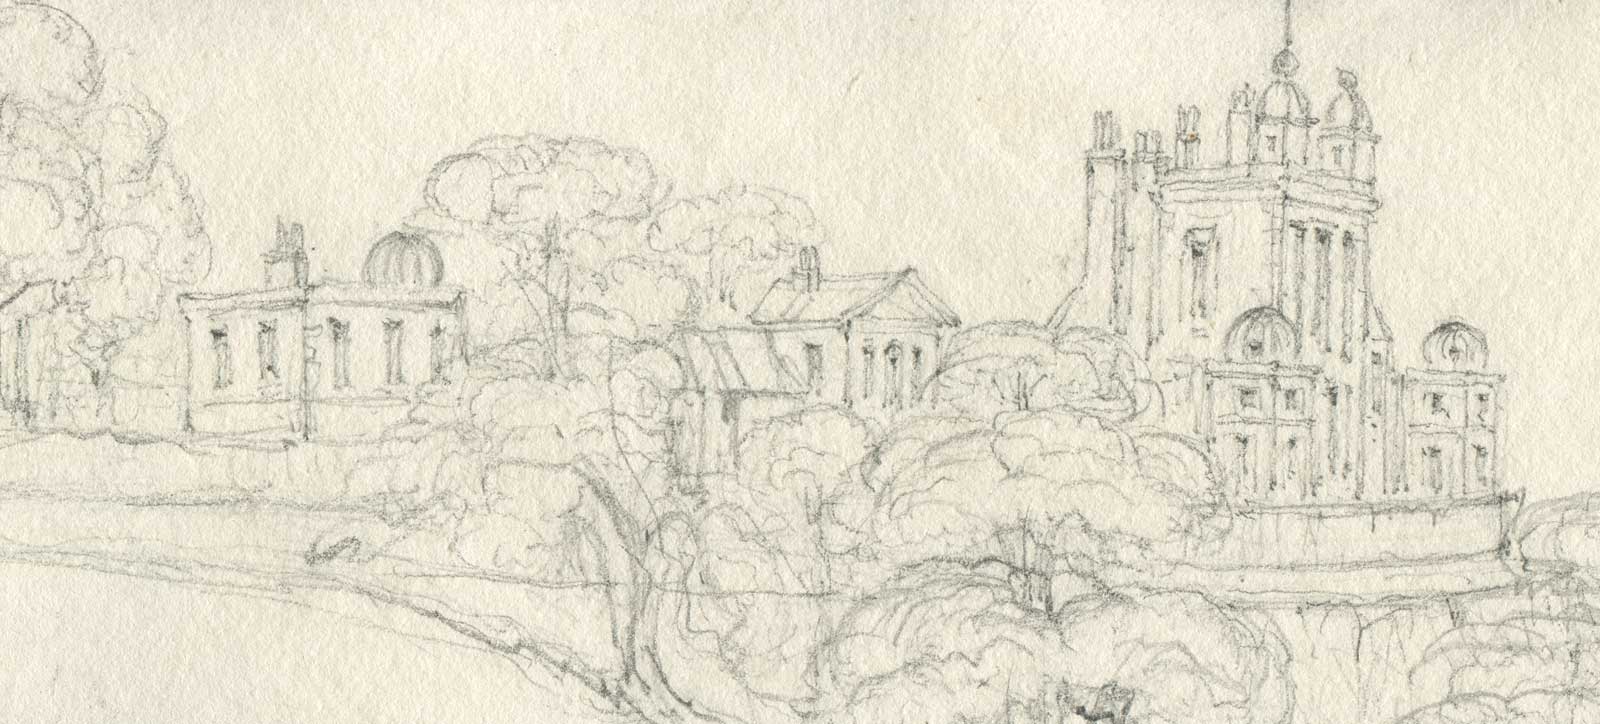
The perspective of this rather cruder drawing of the Observatory gives a rare glimpse of the eastern wall of the Meridian Building (left) as it existed between 1821 and 1855 when Airy's new fireproof store was added. Detail from a pencil drawing by an unknown artist, 1838–1840

The middle section was built in two stages. The ground floor contained the apartment for the First Assistant and was completed in 1815. The upper floor was built in 1821 and originally contained the library. The extension to their left was built by airy in 1855. Photo taken August 2014
In 1821, charge of the chronometers of the Royal Navy was transferred from the Hydrographic Office to the Observatory. The first floor room located on the south side (above the workshop) of the 1813 extension that had been put to use as a library was appropriated for the chronometers and an additional floor built above the single story apartment to accommodate the displaced library (RGO6/1/55). In 1824, a second mural circle was erected alongside the first, necesitating an alteration to the layout of the Circle Room and its roof.
The fireproof Record Rooms
The 1855 extension was of two stories. The general design was sketched out by Airy in June 1853, but the detail was overseen by Lieutenant-Colonel Greene, civil architect at the Admiralty, who estimated the cost at £550 – roughly £30 more than the original Wren Observatory (B of V report 1854). The works incorporated the creation of an access corridor though the old 1813 apartment by carving off the south side of the First Assistant’s room. It was also planned originally to remove the chimneys protruding through the centre of the library above, but this was not done until very much later in 1931/2 when the by then former library was fitted up as a new room for the reception of wireless time-signals.
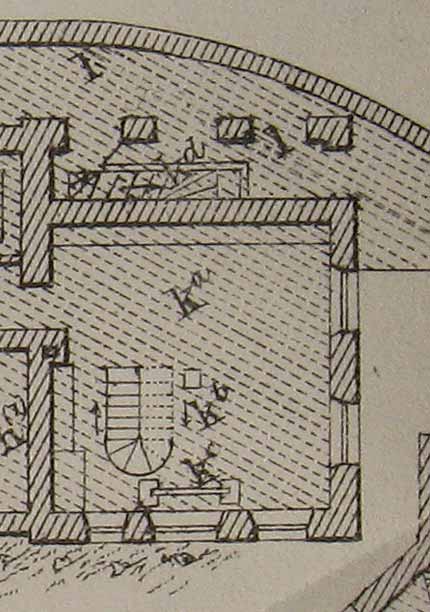
1863 plan of the Lower Record Room. Key: (Kb) iron staircase. (kc) official standards of length and weight. (kd) arcade
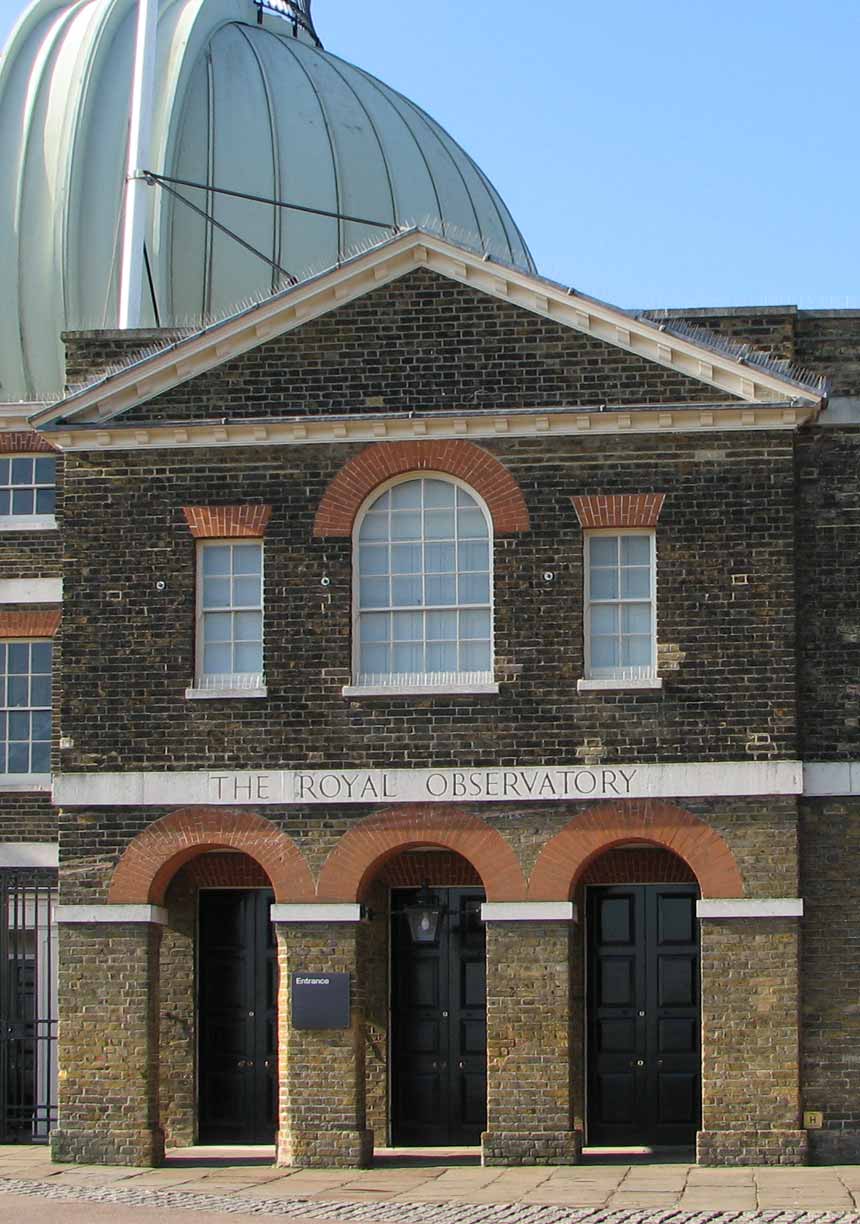
Airy's 1855 extension as it appeared in June 2009. The three door openings were created in the early 1990s, allowing the arcade to be used as the main Vistor Entrance to the museum site
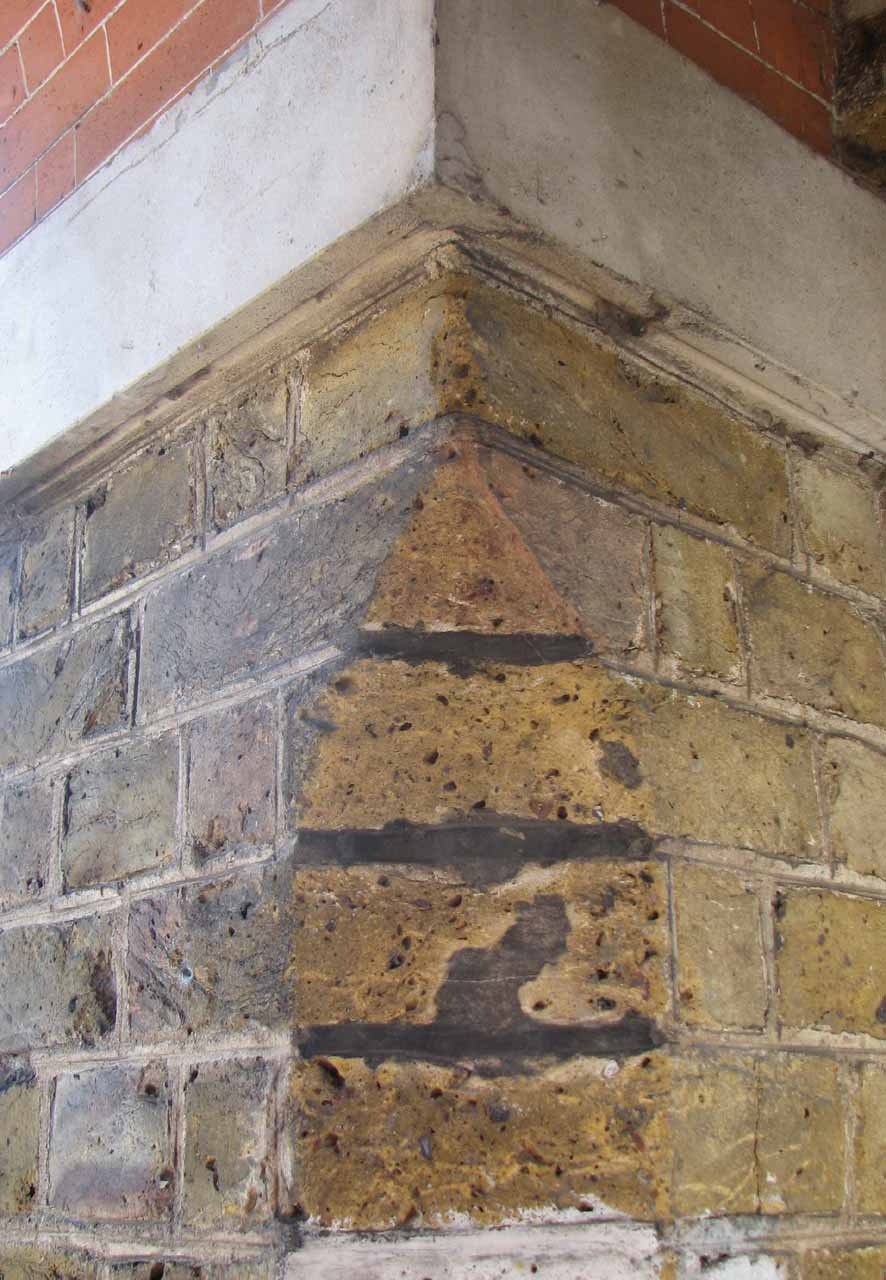
Chamfered brickwork on the eastern pillar
The rooms in the two stories were known as the Upper and Lower Record Rooms. They were connected by a U-shaped iron staircase. To render the rooms fireproof, the shelves were of slate, the windows fitted with steel shutters and the rooms heated indirectly though a stove in the basement which was accessed externally via a set of steps running along the north wall under the arcade. The Official copies of the British Standards were kept in a specially designed box that rested on two stone piers erected for the purpose on either side of the central window on the south side of the lower room so that they could be easily inspected. In today’s museum, this window has been replaced by the double doors that for a while every paying visitor passed through on their way to the ticketing point. The shelving was increased in an ad hoc manner as and when required.
Plans of the building in 1847 and 1863
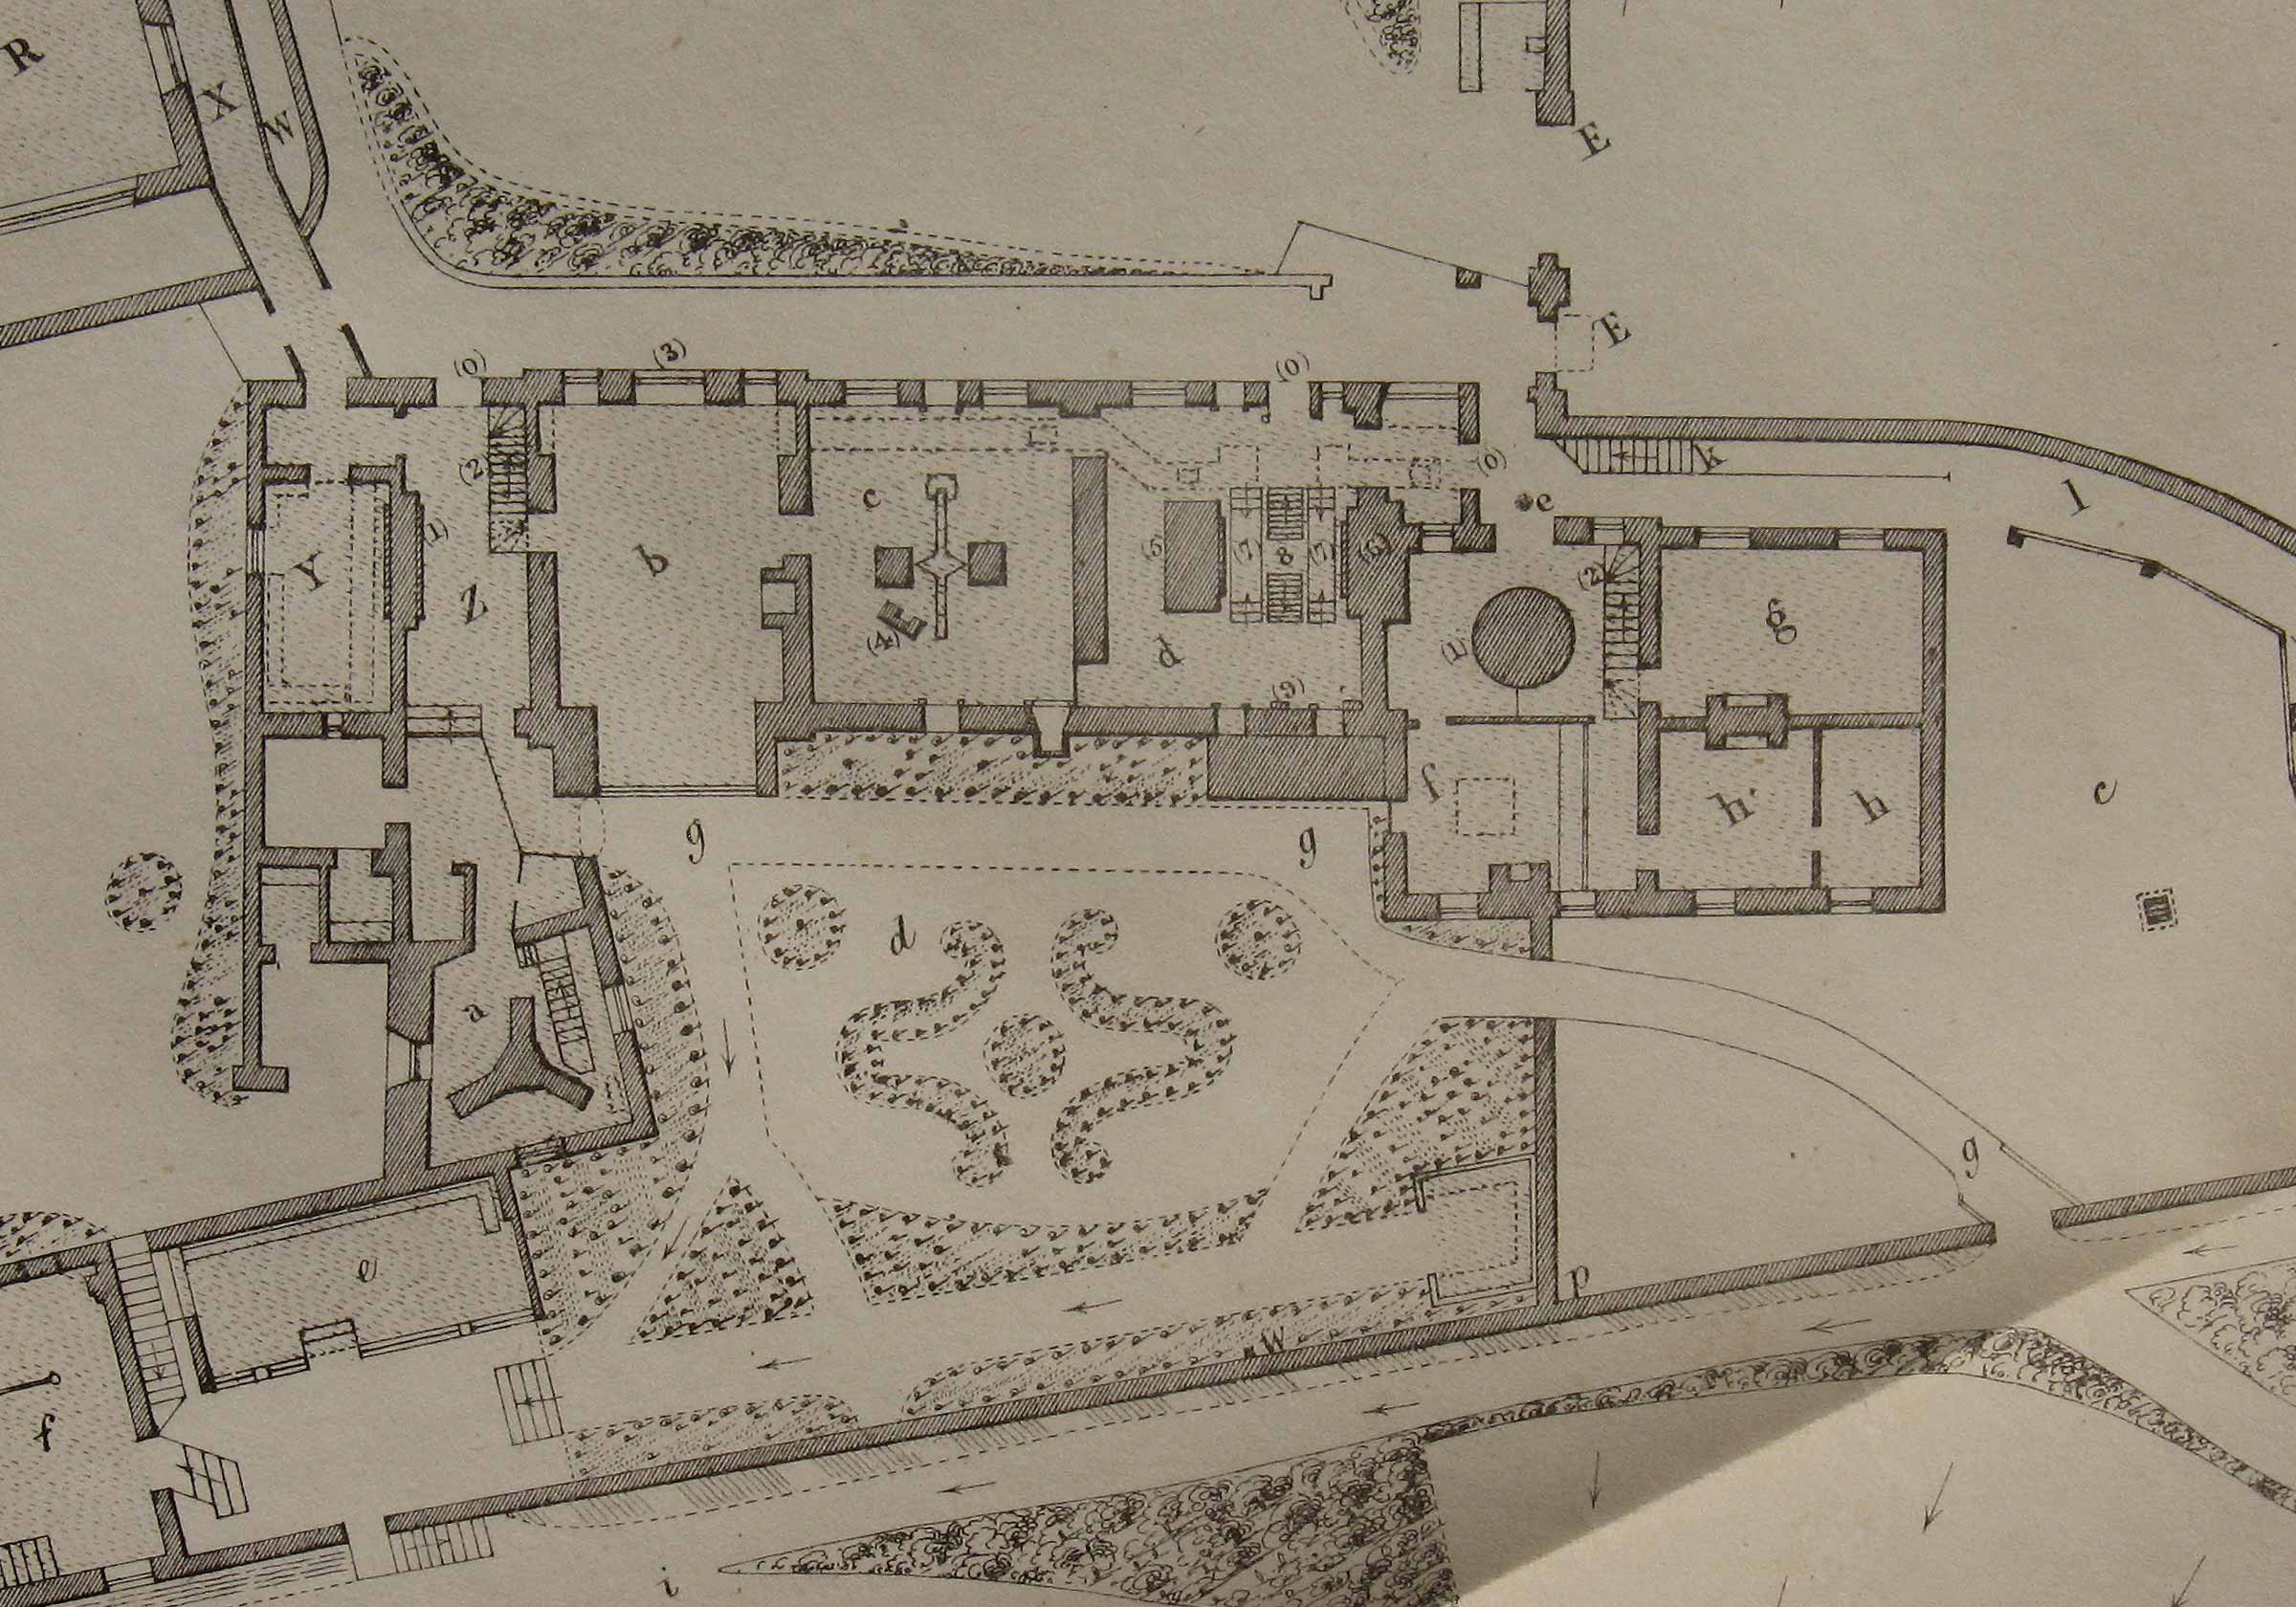
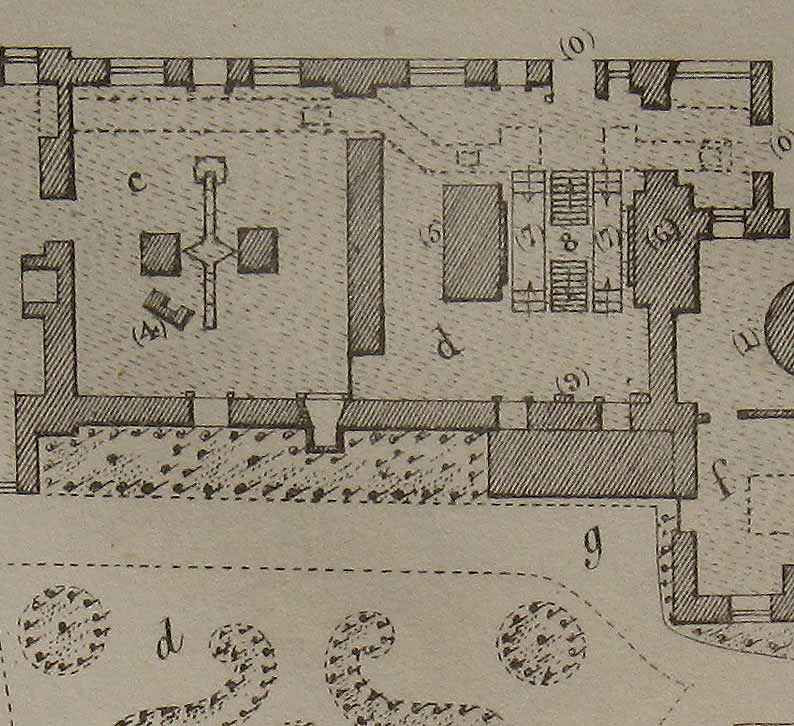
Ground Floor plan of the Meridian Building in 1847. Detail from a plan published as an addendum to the 1845 volume of Greenwich Observations. Key (for Meridian Building only). From left to right: (Y) Safe Room. (Z) Passage Room. (0) entrance. (1) Quadrant Pier (Halley's). (2) staircase ascending to Assistants' rooms above b. (a) Altazimuth pier, formerly the site of the Advanced Building and before that, Flamsteed's Observatory. (b) Computing Room. (3) the original entrance (now a window). (c) Transit Room. (4) Pier for the transit clock. (d) Circle Room. (5) Pier for Troughton's Circle. (6) Pier for Jones's Circle. (7) pits for accessing the lower microscopes. (8) stage for accessing the upper microscopes. (9) pier for the clock. (0) entrance. (e) entrance to the SE Building. (1) pier built for the Shuckburgh Telescope. (2) staircase to the upper floors. (f) an old kitchen (Chronometer Room above). (g) First Assistant's Room. (h) two rooms for the assistants. Above G and h, h is the Library. (k) staircase to cellar containin a stove
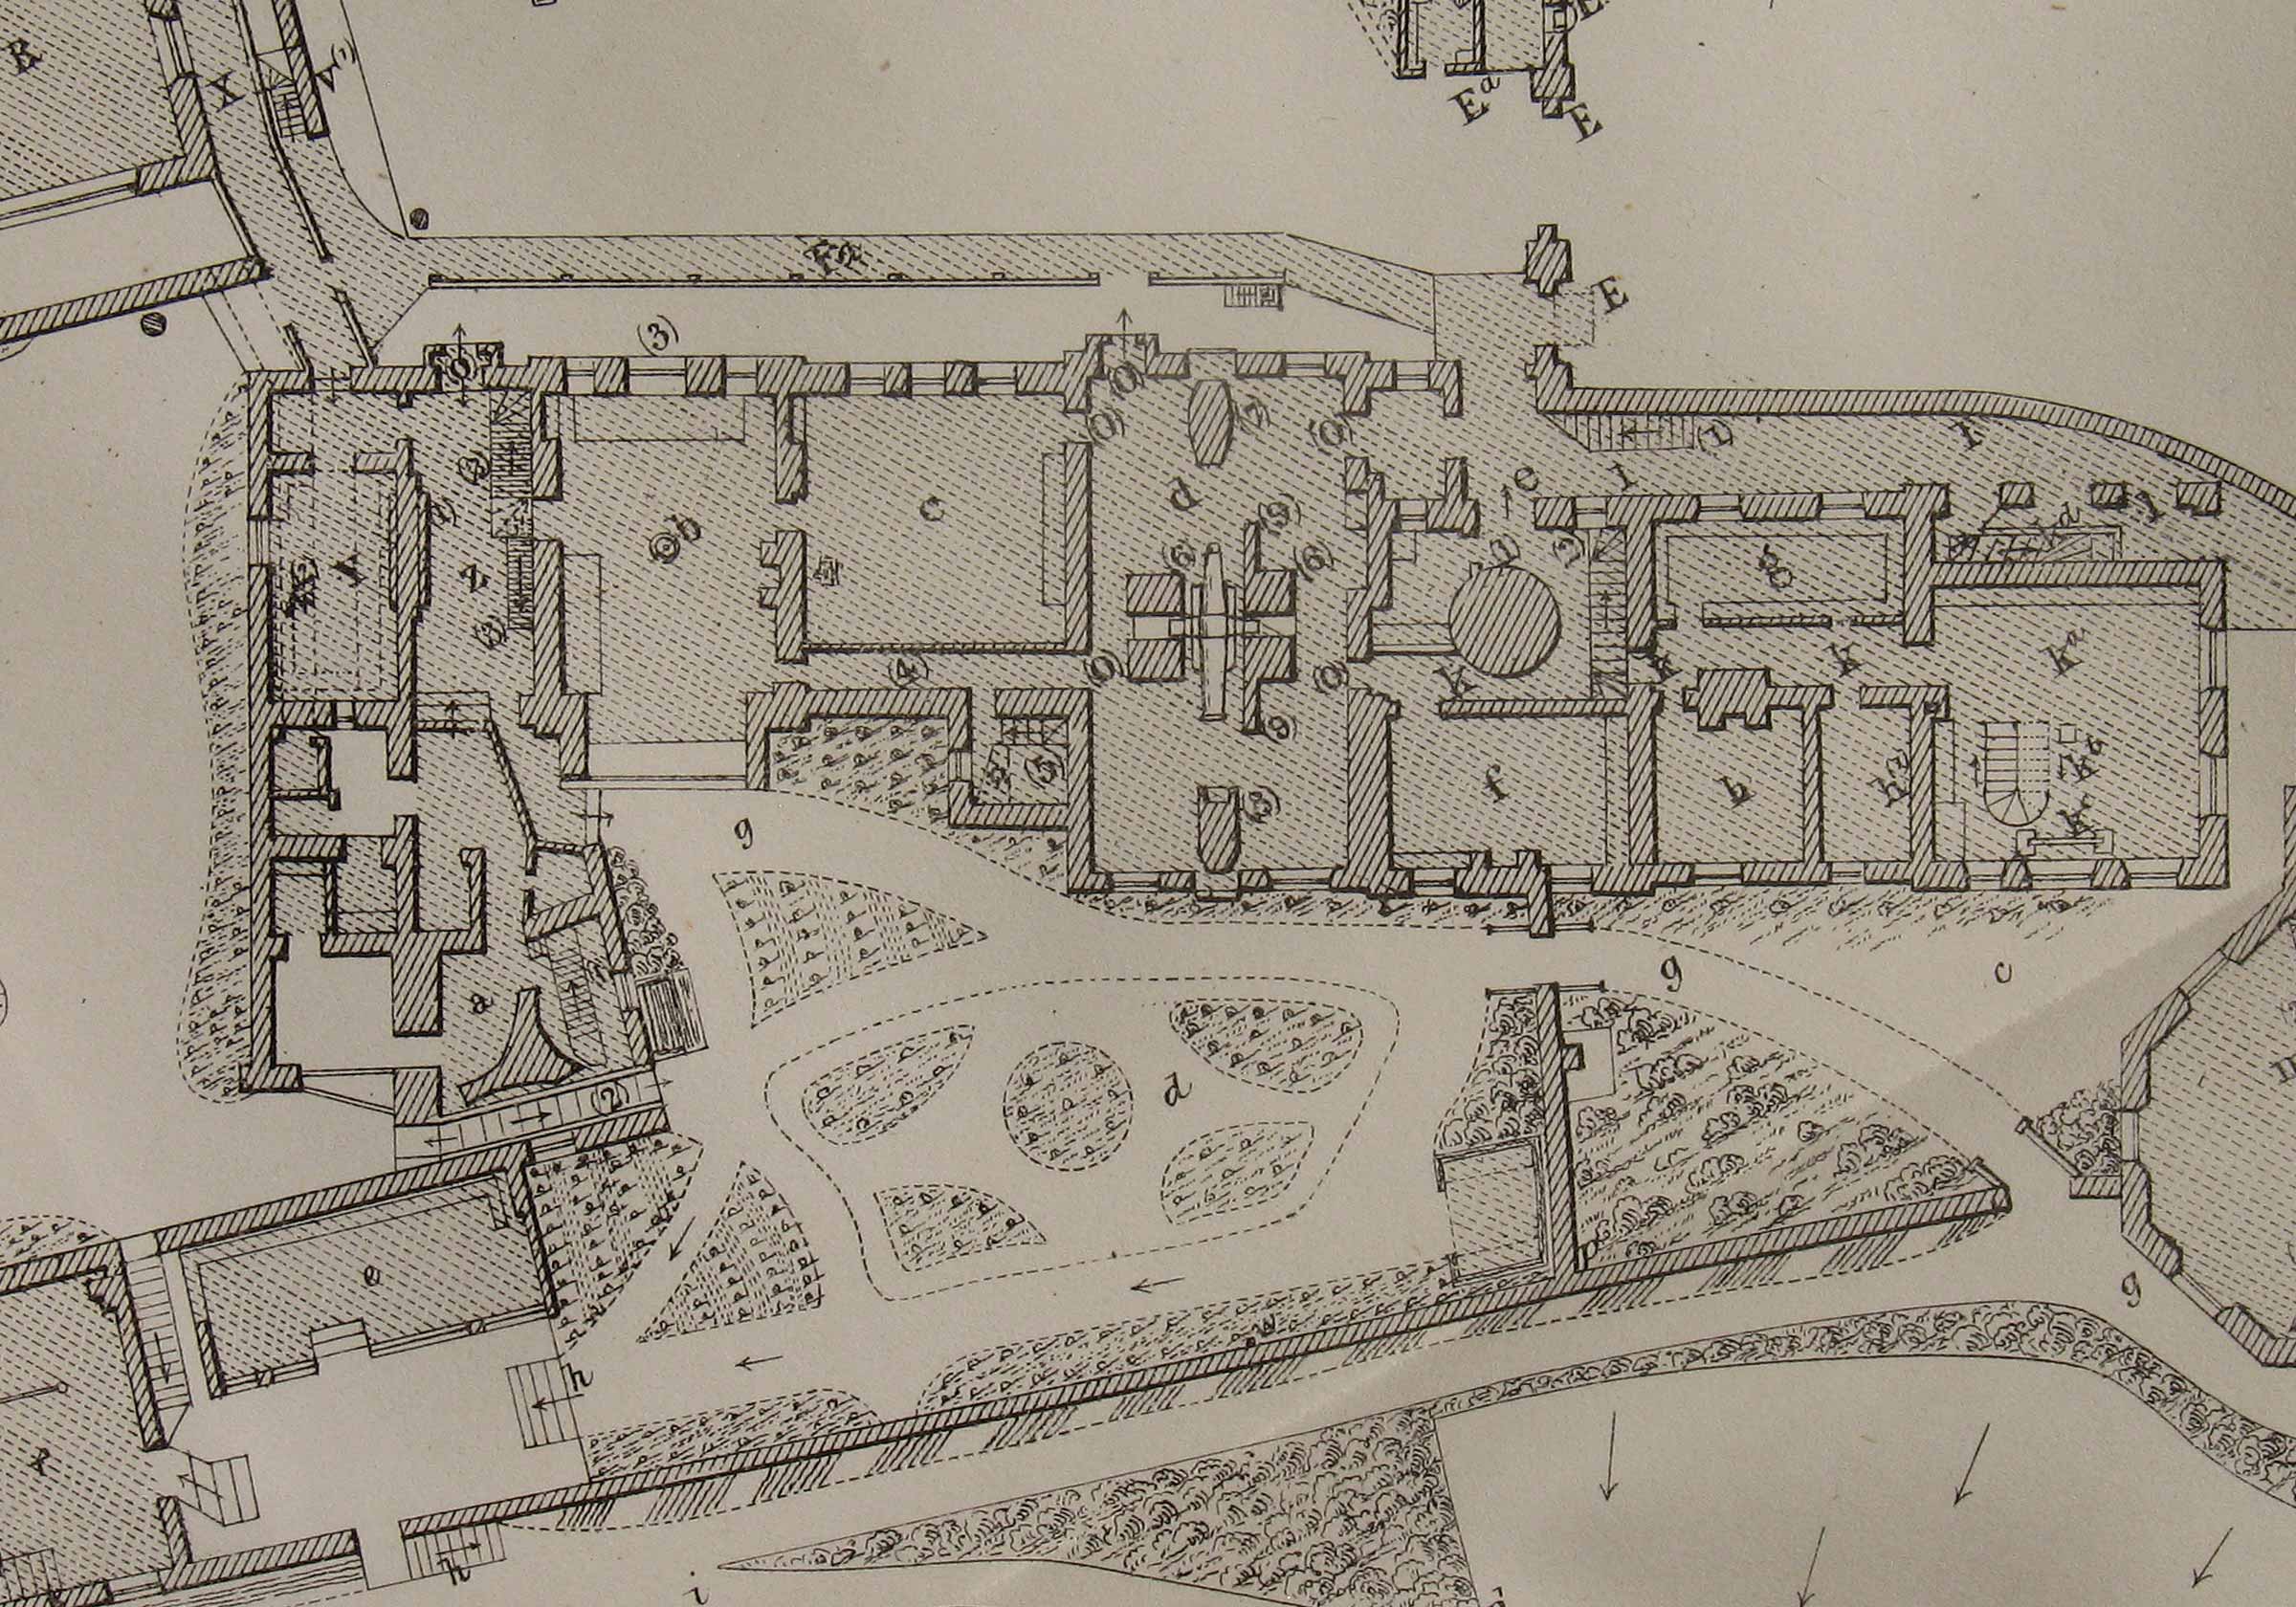
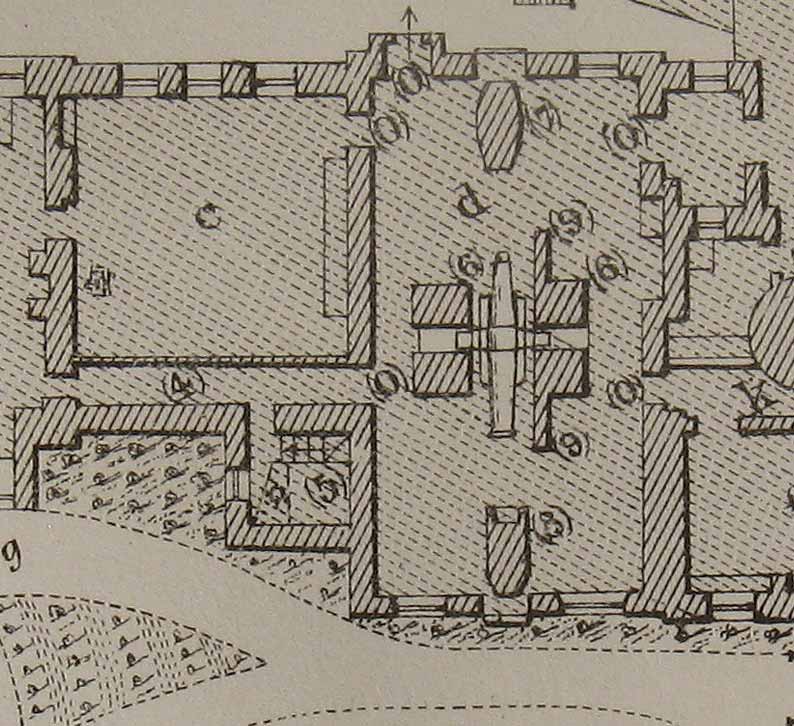
Ground Floor plan of the Meridian Building in 1863. Detail from a plan published as an appendix to the 1862 volume of Greenwich Observations. Key (for Meridian Building only). From left to right: (Y) old Safe Room (Record Room). (Z) Passage Room. (0) entrance. (1) Quadrant Pier (Halley's). (2) staircase ascending to the Chronometer Room and Office. (3) ladder to the lamp of mark of the Altazimuth collimator. (a) Lower Depôt and Altazimuth pier, formerly the site of the Advanced Building and before that, Flamsteed's Observatory. (1) staircase to Upper Depôt. (2) Tower Passage. (b) Computing Room, with the Chronometer Room and Office above. (3) the original entrance (now a window). (c) Astronomer Royal's Official Room. (4) passage. (5) Reflex Zenith Tube Room. (d) Transit Circle Room. (6) Piers of the Transit Circle. (7) pier for the north collimator. (8) pier for the south collimator and transit clock. (9) pier wings carrying part of the mercury apparatus (for reflected observations. (0) entrances. (e) entrance to the East Buildings. (1) pier built for the Shuckburgh Telescope. (2) staircase to the upper floors. (f) First Assistant's Room with Library 2 above. (g) Depôt for publications. (h) Assistants' Common Room. (h(1)) Second Assistant's Room. Above G, h and h(1) is the Library. (k) passage. (ka) Lower Record Room. (Kb) iron staircase. (kc) official standards of length and weight. (kd) arcade. (l) long passage to the Magnetic Ground. (1) descent to cellar
Early alterations to Flamsteed’s Observatory
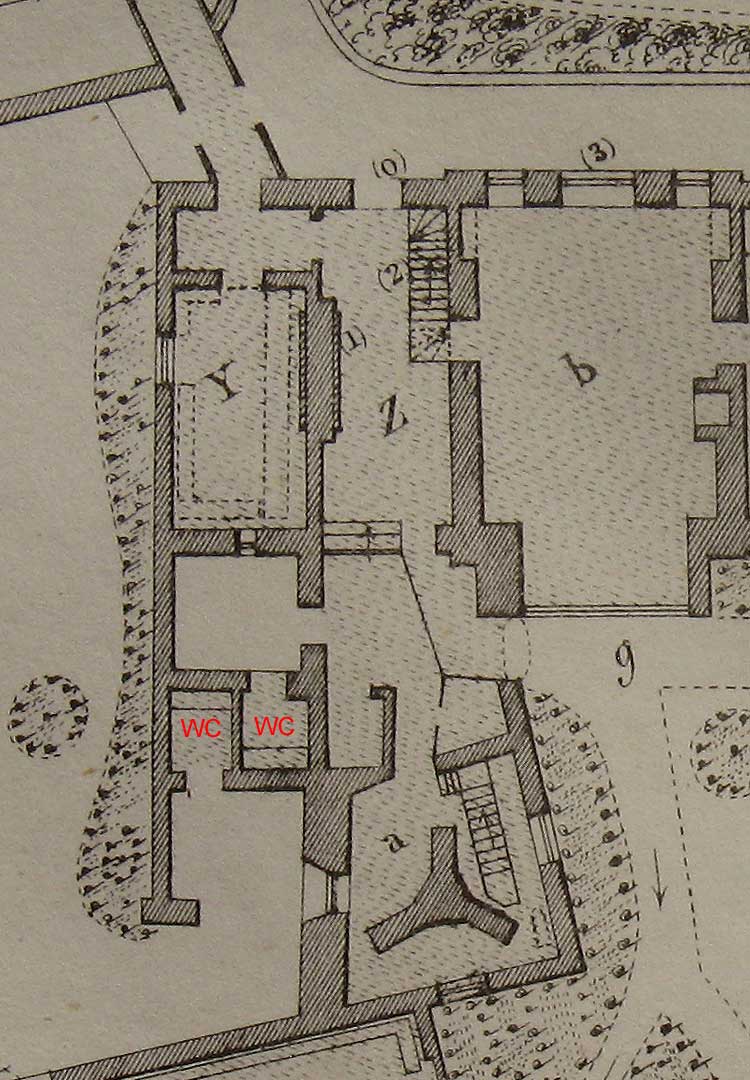
The west end of the Meridian Building in 1847. Detail from a plan published as an addendum to the 1845 volume of Greenwich Observations. The toilets Airy built in 1835 are marked (WC). Those on the left could be accessed from his private Upper Garden. Those on the right were available for staff working in the Meridian Building. The pier of Airy's Altazimuth telescope erected in 1844 on the site of Flamsteed's Sextant House is marked (A). (Y & Z) is Bradley's former Quadrant House, which Airy divided soon after his arrival. The ticketing point for the Observatory now occupies the site Flamsteed's Sextant House and the WCs
The greatest structural changes in terms of external appearance were made at the western end of the Meridian Building. At the Visitation on 18 August 1762, which took place following the death of Bradley, it was resolved to fit out Flamsteed’s Sextant Room with a ‘circular versatile roof for the reception of the 40-inch moveable quadrant’. The history of Flamsteed’s Observatory between his death at the end of 1720 and the modifications of 1762 is obscure. What we know comes from snippets contained in the correspondence carried on between Flamsteed’s two former assistants Joseph Crosthwait and Abraham Sharp. By June 1721, Halley had ‘pulled down part of the meridional wall’ i.e. the west wall of the Quadrant House (Baily’s Flamsteed p.343). By December 1721 he had converted the Sextant and Quadrant Houses into a pigeon-house (Baily’s Flamsteed p.346). By 1773, Flamsteed’s Quadrant House had been completely demolished, though quite when it went is uncertain. Its site became incorporated into the Upper Garden.
When Airy discovered on his arrival in 1835 that the only toilets available to the staff were those that had been built for Flamsteed in the south west corner of his Upper Garden, he took steps to ensure the future privacy of the garden by having a new set of staff toilets built on the site of Flamsteed’s Quadrant House.
In 1779, Flamsteed’s Sextant House was altered for a second time, this time by raising its north wall and placing above the room a steep wooden roof with sliding shutters sloping down to the south. The room was referred to both as the Enlarged Room South of the Quadrant Room and as the Advanced Building on account of it being ‘advanced to the south of the Quadrant Room’ (RS MS600/59). It is at this time that the former Sextant House became linked to, and accessible from the Bradley Observatory. In The Advanced Building was described by Thomas Evans, assistant in the late 1790s as being:
‘… a small wooden building for the purpose of observing eclipses of Jupiter's satellites, occultations of stars by the moon, and whatever else requires merely the use of a telescope at the time. It is furnished with sliding shutters on the roof and sides, to view any part of the hemisphere from the prime vertical down to the southern horizon, and contains a forty-inch achromatic, made by John Dollond, the inventor of them, with a triple object-glass, and is certainly the most perfect instrument of the kind ever yet produced; there is also a five-feet achromatic, made by Messrs. John and Peter Dollond, of St. Paul's Churchyard, sons of the former; a two-feet reflecting telescope, the metals of which were ground by the Rev. Mr. Edwards, and a six-feet reflector by Dr. Herschel’
Click here to read more of what Evan’s wrote about the Observatory.
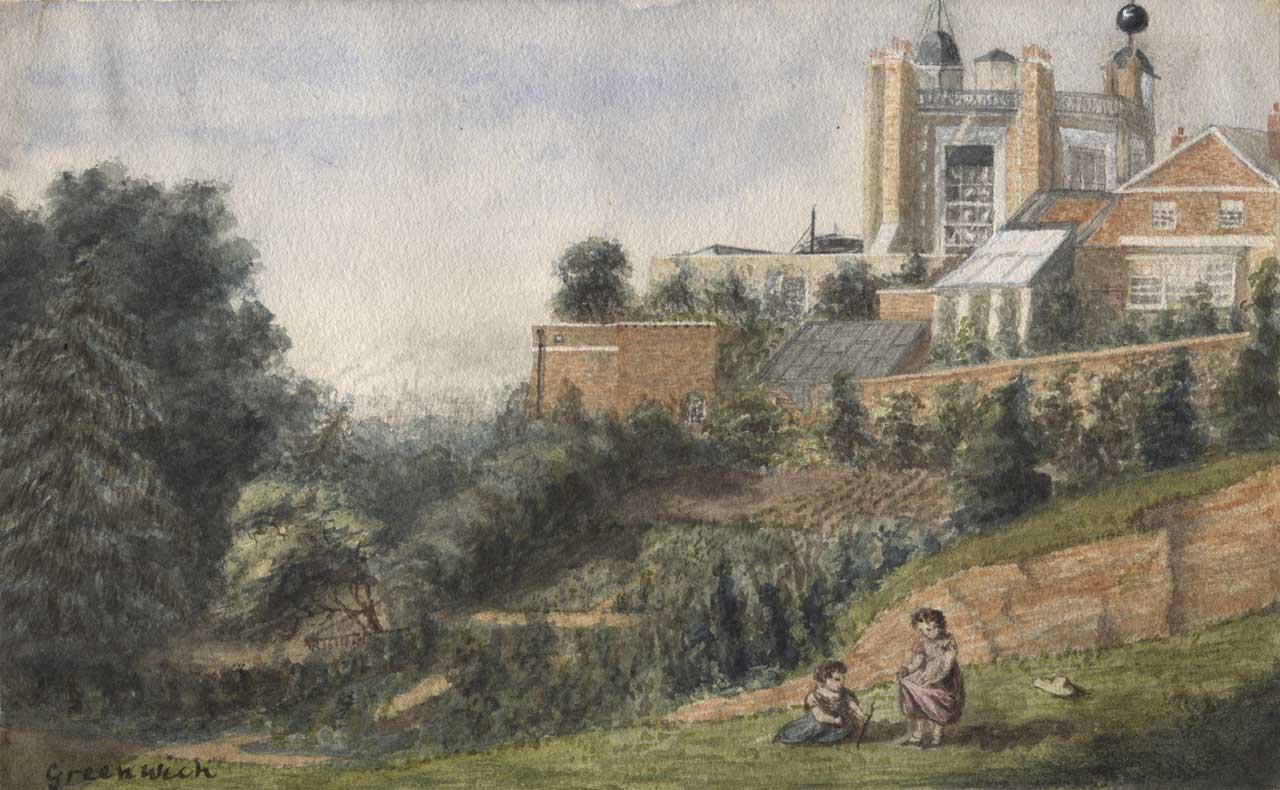
Flamsteed House and the west end of the Meridian Building from the south in about 1841-43. The Computing Room with its newly enlarged window is visible on the right. To its left, is the Advanced Building (looking a bit like a greenhouse), with the roof of the Quadrant Room built for Bradley behind it. Watercolour painting by Henrietta Smythe. © The Scout Association Heritage Collection (see below)
In 1807, the Visitors recommended that the Advanced Room should be detached from the Quadrant Room by removing part of the antichamber leading to it (RS MS600/59). At the same time, they ‘recommended to procure if possible white tiles in the place of the black glazed tiles, which cover the present observing rooms & are thought prejudicial by adding to the heat of those apartments’. Whilst shedding no light on the second recommendation, the plan of 1831 (RGO6/45) suggests that the first recommendation was never enacted.
The South Dome
In 1844, the Advanced Building’s roof was removed and the South Dome built on its walls for Airy’s new Altazimuth Instrument. During its construction a foreman fell into the foundation pit and broke his leg, of which accident he died.

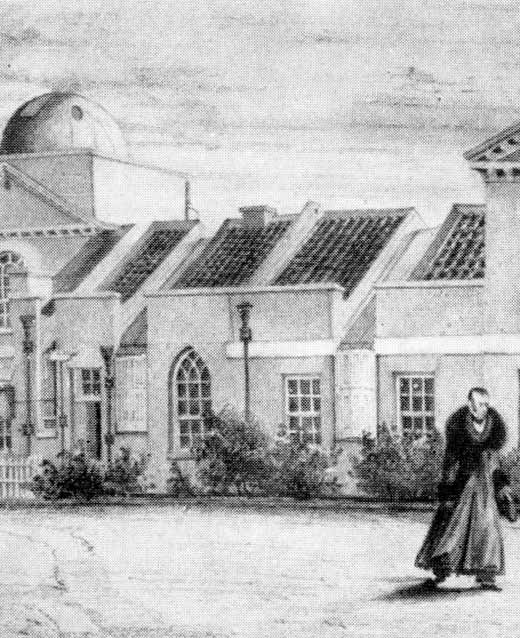
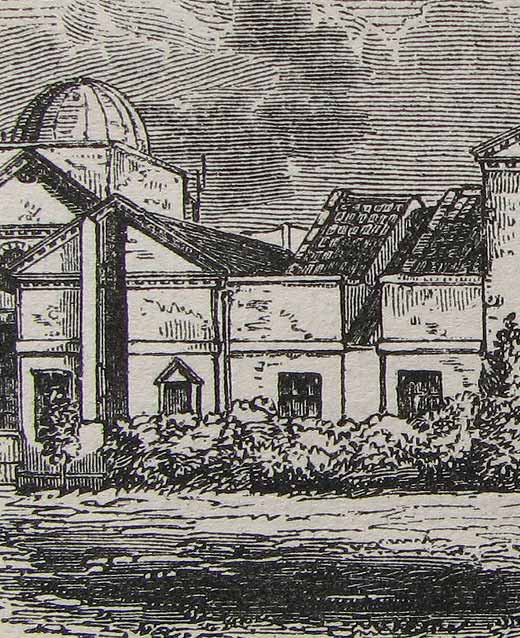
The Meridian Building from the west in about 1845-49. The former Quadrant Room built by Bradley is on the left and the South Dome housing Airy's Altazimuth Instrument in the centre. The pole to its right is some distance behind and is part of the Magnetic Observatory. Watercolour painting by Henrietta Smythe. © The Scout Association Heritage Collection (see below)
The dome was at third floor level and accessed via a stairway that rose from the ground floor to the second floor on the eastern side of the building and from there to the dome on the northern side. A sloping passageway known as the ‘Tower Passage’ was cut through the south side of the ground story and basement in 1856/7 to give easier access between the Astronomer Royal’s private Upper Garden to the west and his Middle Garden to the east. In order to facilitate this, Airy shaved a small amount off one of the rays of the three-armed pillar that supported the telescope. Although the amount sliced away was relatively small, it had an unfortunate and unanticipated effect on the telescope above, which was found to have slowly tilted by 23 seconds of arc. As originally built, the tower was of plain brick with no windows on the top floor.
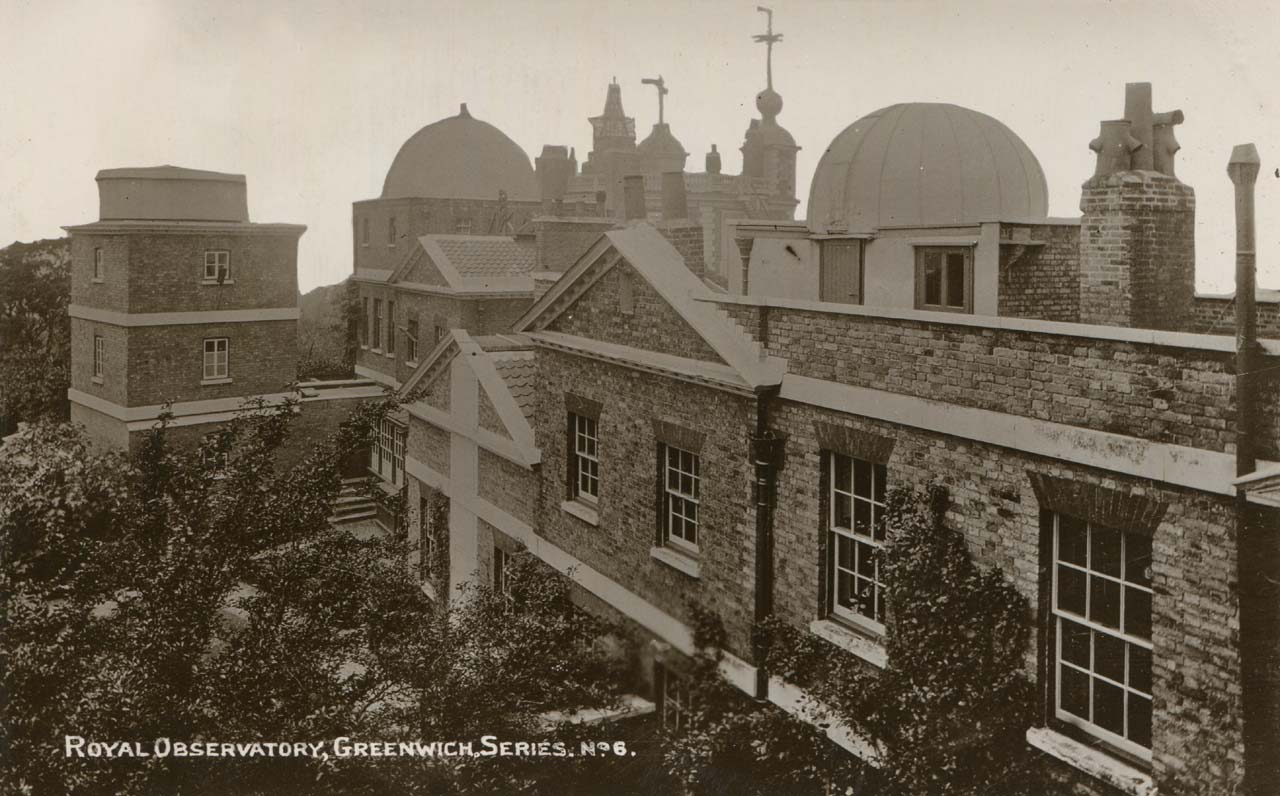
The south side of the Meridian Building form the east in about 1908. The South Dome containing Airy's Altazimuth Instrument is on the left. The dome in the middle contained the Astrographic Telescope and the one on the right the Sheepshanks Equatorial. The Sheepshanks Equatorial could only be accessed from the roof. Of the two doors which are are visible at roof level, the solid one on the left gave access to the dome, whilst the one to its right (with the glass panels) gave access to the stairs to the floor below. Postcard published by Henry Richardson, Greenwich
The stone string courses between the floors together with a more elaborate coping at the top were added in 1857/8 to bring its appearance into harmony with the rest of the building. Windows were pierced in the south and east sides of the upper story in 1863/4 to increase the ventilation In 1873/4, the first-floor-room under the Dome, which had until then served as the Upper Depôt in which the stock of Greenwich publications were stored, was fitted with shelves and became an extension of the already much extended Library. It was known as Library 4; Library 3 having been created at about the same time in a new closet close to the door of Library 2.
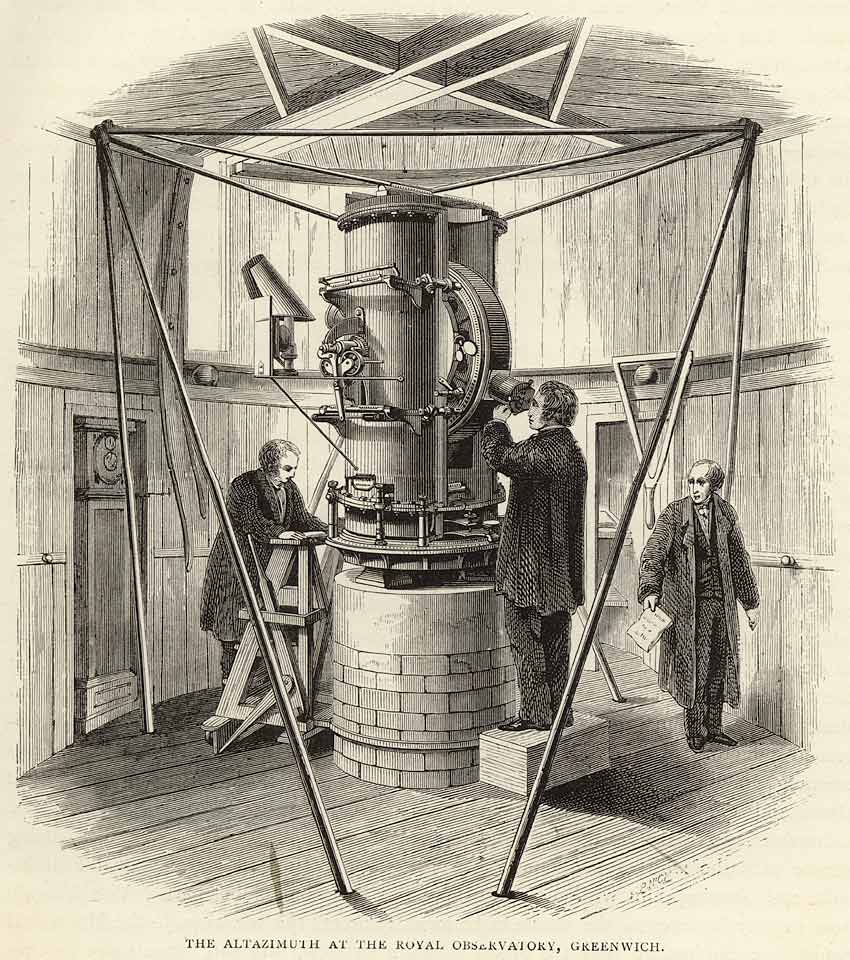
Airy's Altazimuth Telescope. First published in an article by Edwin Dunkin in the 1862 volume of The Leisure Hour, the image was later reprinted in the 1891 edition of Dunkin's The Midnight Sky

The photoheliograph in the South Dome. From Sun-Storms and the Earth by E Walter Maunder. Harper's Monthly Magazine (Sept 1912)
Following the Altazimuth’s retirement, the dome was modified and used from 1911 onwards to house the Dallmeyer photoheliograph. To create a wider opening, one quarter of the original dome was cut out and a corresponding quadrant fixed permanently in the north, so that the dome could be closed by bringing the opening under this fixed covering. Although this instrument had been in use at the Observatory since 1873, this was the first time that it had had a permanent home. The photoheliograph was transferred from there to Herstmonceux in 1949. The South Dome was largely demolished in the 1960s when the building was converted for museum use, and replaced by a single story structure designed to give an impression of Flamsteed’s original Sextant and Quadrant Houses. A substatnial amount of brickwork from Flamsteed’s time, survives in its the eastern wall and southern walls.
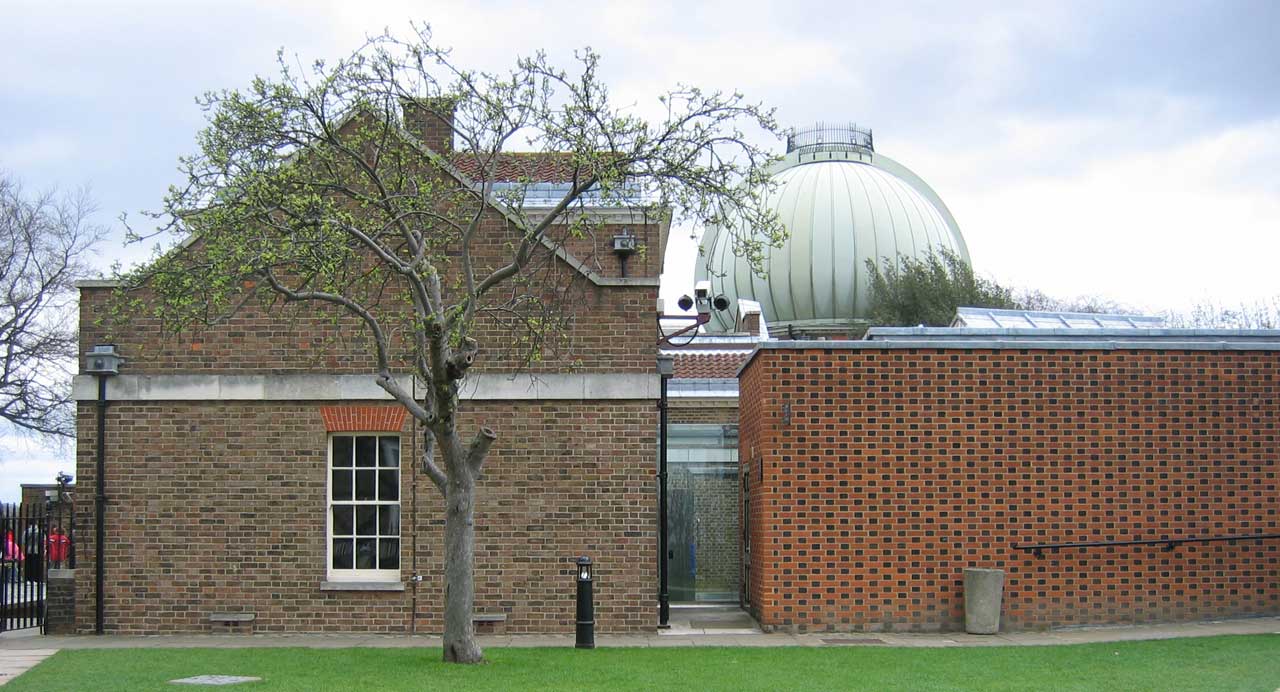
The Meridian Building from the west in April 2005. The apple tree, a rare living survival from the days of the working observatory was felled later that year. Bradley's Quadrant Room is on the left.. The toilets created by Airy were behind the chequered wall on the right. Neither this wall, nor the wall of Bradley's Quadrant Room are original, both having been demolished and rebuilt in the 1960s during the conversion of the building for museum use.
Alterations to the Bradley Observatory
As well as constructing the Advanced Building in 1779, Maskelyne also made changes to the rooms in Bradley’s Observatory, and the Octagon Room in Flamsteed House with a view to increasing the accuracy that could be attained with the instruments. In Bradley’s Observatory, the flat ceilings were removed from the Transit and Quadrant Rooms and the roof openings increased from six inches to three feet. The roof was insulated and the southern windows together with those in the east and west walls bricked up ‘to keep the rooms cool’. At the same time, to enable the 12½-foot zenith sector to be more easily reversed, the hip roofs were removed and the roof-ridges extended to the end of the building. The various works necessitated a complete break in the observing programme. Observations with the quadrants ceased on 10 May and with the transit instrument on 30 July. Observations with both instruments recommenced on 22 October. Click here to read Maskelyne’s own description of the changes he instigated.
The last recorded observation with either of the Quadrants was on 2 January 1825. By the late 1820s, the western side of the room was sometimes referred to as the Pendulum Room. It was where Edward Sabine carried out his pendulum experiments in 1828 and 1830. One of the clocks by Graham and the iron pendulum frame were fixed to the south wall and a vacuum apparatus set up in the south-west corner. Click here to read about the 1828 experiments and click here to read about those carried out in 1830.
On his arrival in 1835 or not long after, Airy divided Bradley’s Quadrant Room to create what became known as the Second Quadrant room on the western side, and the Passage Room on the eastern. It was probably at this time, that Bradly’s original window in the western wall was reinstated (it was later bricked up again, probabaly in 1939, and reinstated for a second time in the 1960s when this end of the building underwent extensive alterations for museum use). In 1839, the Second Quadrant Room was converted into a fireproof manuscript room in which it was also proposed to store other valuable articles such as a duplicate set of parliamentary standards. At the same time, a covered passageway was constructed to provide easy and dry access to the Meridian Building from Flamsteed House. The works involved converting the window on the north wall of the Second Quadrant Room into a doorway and slightly truncating the room by slicing off its northern end to provide an entry point to the Passage Room. The east side of the fireproof room was formed by the pier that at that time still carried the quadrant by Graham that had been made for Halley, together with a Fixed Telescope erected by John Pond for the observations of α Cygni. Airy removed the Fixed Telescope, but retained the quadrant which he restored to working order such ‘that, if any future astronomical antiquary should desire, observations may be made with it’. A fireproof ceiling was created by erecting arches of brick-work. Conscious of the historic legacy for which he was now responsible, Airy proposed ‘leaving vacant a part at the end of one of the arches’ and covering it with a flat stone, which could be ‘removed with little trouble’, so that the quadrant could still command when required a view of the northern skies. It is not clear if the movable stone concept ever came to fruition. If it did, its functionality was short lived as between 1846 and the early 1850s; the shutter opening in the roof appears to have been tiled over. The room became known as the Safe Room. It remained in use after the building of the new fireproof store and record rooms at the other end of the building in 1855, but the distance between the two rooms, rendered it increasingly inconvenient – so much so, that in 1868/9, Airy removed all the remaining papers to the larger record room and appropriated the Safe Room for the storage of books and papers relating to local institutions together with some of his own.
The first alterations to the central part of the Bradley Observatory were made for Airy, in 1835 when the Calculating Room – by then known as the Computing Room, was enlarged by building a bay window on the southern side that intruded a few feet into the Middle Garden. Then in 1842, the lobby on the north side was incorporated into the room, the double doors leading to the outside being converted into a window. To compensate, a new doorway into the building was created in the former Quadrant Room where the window on the north side of the Passage Room had been. New doorways were also inserted in the eastern and western walls of the computing room to allow access from the Passage Room to the Transit room. The staircase to the upper floor was removed and relocated to the passageway to the west. This involved punching a new doorway though the dividing wall at the upper level. At the same time, the upper room was divided to provide an entry lobby leading to two rooms for the assistants – a smaller one to the north and a larger one to the south. Each of the two rooms was fitted out with a closet. These rooms it would seem were designed not as offices, but rooms to sleep in. It appears they were little used; so when in 1851, space was running out for new books in the library, Airy decided to move the Chronometer Room here, releasing the old Chronometer Room next to the existing library for books. The old Chronometer Room became known as Library 2, the existing library becoming known as Library 1 or the Principal Library. Click here to read a contemporary account by First Assistant, Robert Main of how the computing room functioned in 1850.
As pressure on computing space mounted, some of the computing operations were moved in 1861/2 to the middle floor of the recently constructed South-East Dome (the present 28-inch dome). In order to avoid confusion, the original computing room was renamed the Principal Computing Room. Then, because of the need for a fireproof store for the chronometers, there was a swap around in 1868. The chronometers were moved to the middle floor of the South-East Dome and the room that they had occupied above the Principal Computing Room was converted into additional computing space. The two computing rooms were then renamed the Upper and Lower Computing Rooms. It was in the latter, that the Time Desk was set up in the southern window. This was where an operator sat to make fine adjustments to the time shown by the mean solar standard (the clock from which the time signals were derived) by speeding it up or slowing it down though the application of a current to an electromagnet located near its pendulum. The control equipment first came into use in 1852 when the galvanic time system was set up. But when it was first located in the Lower Computing room is unclear. The Time-Signal apparatus (as it was then known), was certainly there in 1876 when it was described in an article in Nature. In 1861/2, following the reorganisation of the computing room, Airy was of able to report that ‘nearly the whole of the apparatus of Galvanic Chronometers, Clock Regulators, and Galvanometers’ was now collected there. If the system was operated from there before then, is presently unclear.
The Astrographic Dome and the creation of a Clock Room
By the mid 1880s, as the work of the Observatory expanded, there was pressure once again on office space for the assistants and computers. Christie came up with an ingenious plan that would not only increase the space dedicated to computing by more than 50%, but would also give him a new dome which would provide a more permanent home for the photoheliograph which he proposed to mount on one of the 6-inch equatorials that had been originally procured by his predecessor for the Transit of Venus expeditions. In 1887/8, the walls of the old Quadrant Room were raised by two stories and capped with an 18-foot dome, the supporting pillar for the telescope rising directly from the top of Halley’s Quadrant Wall. The middle story was given over to the computers and linked directly with the upper computing room. Meanwhile, the lower computing room on the ground floor was enlarged by knocking down a structural wall to incorporate the Passage Room, the doorway into the Passage Room from the courtyard being converted into a window. A new spiral staircase giving access to all floors was built and the old staircase removed. The works started on 7 November 1887, and apart from the dome, were completed by 21 April the following year, the date 1888 being carved into the stone windowsill of the central window on the north side of the first floor. While works were in progress, some staff were temporarily relocated to the Octagon Room.
The north side of the Meridian Building as seen from the roof of Flamsteed House in about 1908. The Astrographic Dome is on the right. From a postcard published by Henry Richardson
The building works necessitated some alterations to the Safe Room. Halley’s Quadrant was retained on the west side of the old Quadrant Wall, but that of Bradley on the other side was taken down and placed with the collection of other obsolete instruments that had been hung by Airy on the walls of the Transit Circle Room. Not long after, in November 1888, Commandant Defforges from the Paris Observatory (who was over in Greenwich to participate in a series of observations to determine the difference in longitude between the two observatories by telegraphic means), set up a reversible swinging pendulum in the Safe Room to determine the absolute force of gravity at Greenwich. The room appears to have continued to be referred to as the Safe Room until 1911, but no reference has yet been found as to what was subsequently stored there. In 1911, the room was appropriated by Dyson for use as a Clock Room. A second wall was built separated from the outside walls to the West and South by an air space, and double doors provided. The necessary extensions and alterations of the electric cables were carried out by the Engineering Department of the General Post Office during the latter part of October and early part of November.
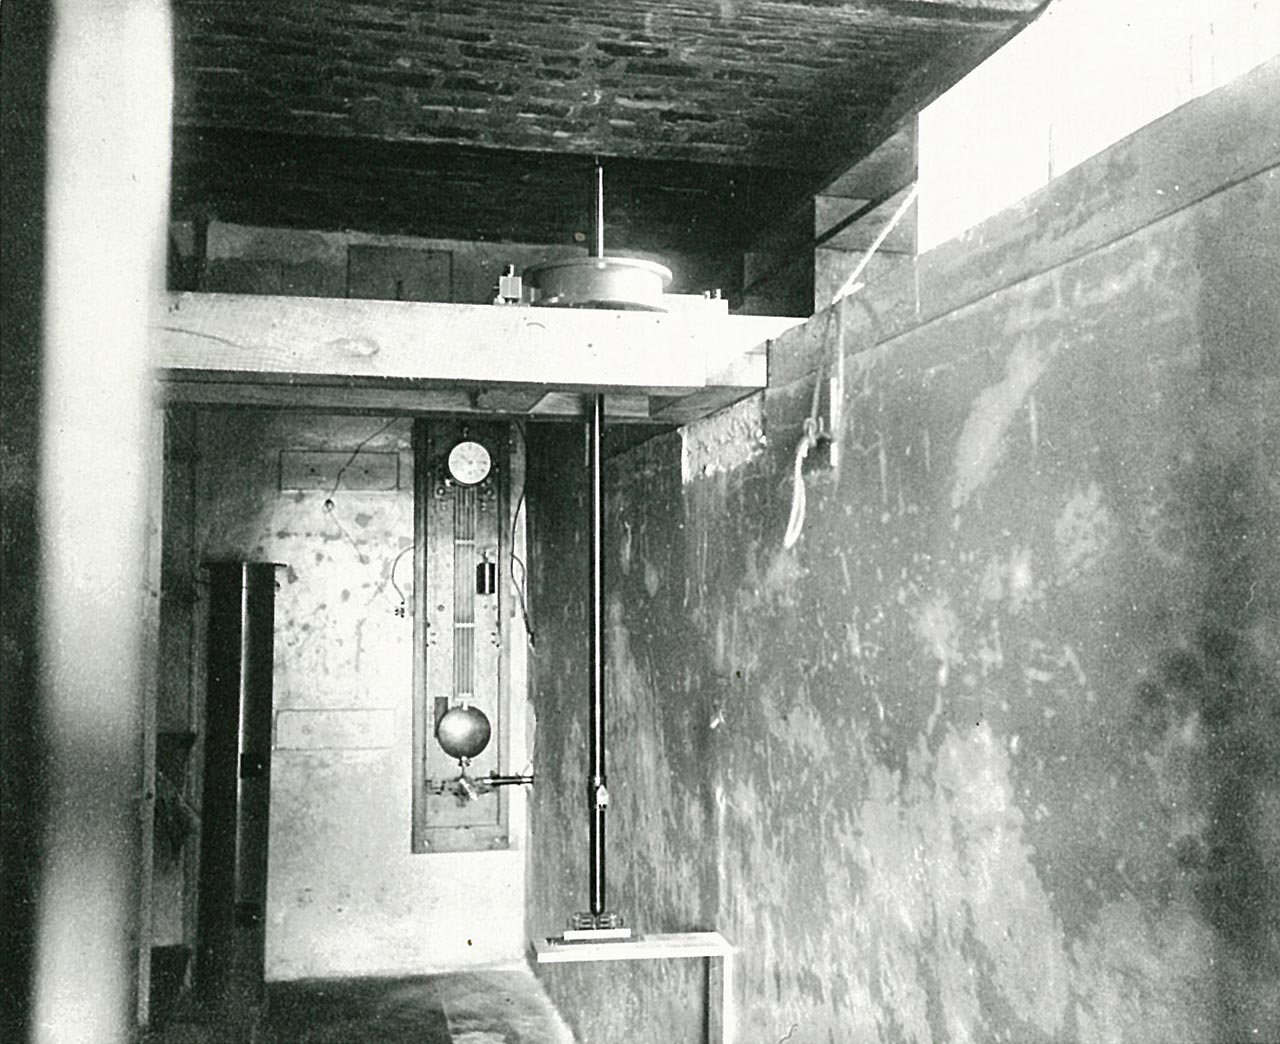
The Safe Room in the autumn of 1888 when it was being used by Commandant Defforges for his pendulum experiment to determine the absolute force of gravity at Greenwich in connection with the French series of determinations. Note the vaulted brick ceiling that was installed to make the room fireproof. The following year, the Indian invariable pendulum was mounted in the Record Room at Greenwich (under General Walker's supervision) for observations similar to those made in India, the United States , and at Kew
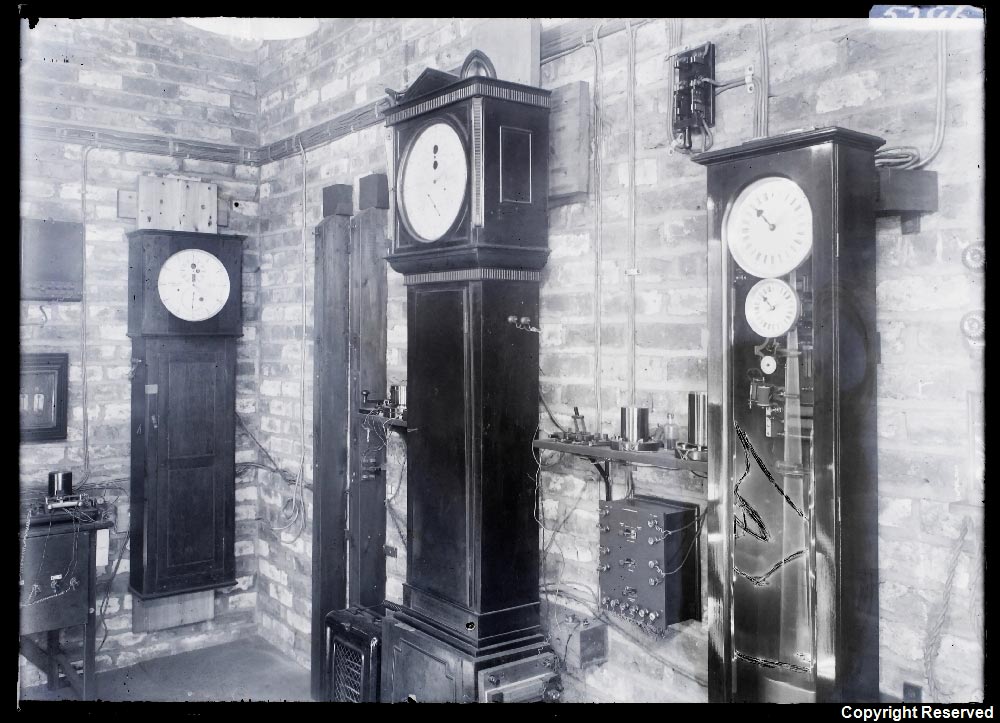
The Clock Room on 7 May 1928. From left to right, the three clocks are: Dent No. 2016, Dent No.2 and the slave clock of Shortt No.11. © BT Heritage. Reproduced under the terms of a Creative Commons Attribution-Non-Commercial-ShareAlike (CC BY-NC-SA) licence (see below)
In true Christie manner, the goal posts moved with regards to the new 18-foot dome and it was never used for the purpose originally intended. Following the reoccupation of the Computing Rooms, the dome was used instead to house the 13-inch Astrographic Refractor – a telescope ordered in 1888 to enable Greenwich to contribute to the recently launched international Carte du Ciel project.
Christie’s enlargement of the lower Computing Room was not entirely successful as he had failed to anticipate the cold draughts that would be created in the vicinity of the staircase particularly during the winter months. In 1903/4, he bowed to the inevitable and had the stairwell screened off from the rest of the Room. The Upper Computing room was likewise screened off in 1928 though probably for different reasons. In 1937, at the suggestion of Humphry Smith, a workshop was set up for the repair and adjustment of watches and chronometers. This was a strategic move designed to both ensure a high standard of work (at that time the work was being done by commercial workshops whose number and standards were in decline) and a continuity of service should hostilities develop within Europe. Part of the Upper Computing Room was screened off by partitions for this purpose. With the outbreak of war in 1939, the whole of the chronometer service was evacuated first to Bristol and then to Bradford on Avon.
Remodelling for the Airy Transit Circle
To the east of the computing rooms, the Circle Room of 1808/9 which had been built to house just one mural circle on a massive freestanding stone wall was altered in the 1820s to accommodate a second that had been made by Jones. A second massive stone wall was built to support it on the east side of the building. It had the appearance of being bedded into the wall, but according to Airy was free of it. The two circles, each six feet in diameter faced each other across the rooms. Each had a set of six microscopes set at 60º intervals around the circumference through which the scale divisions on the instrument were read. To facilitate this, each had a pit in front of it which was entered in order to read the lower microscopes. The upper microscopes were read by ascending a stairway onto a platform that stood between the two circles. When observations by reflection from a tray of mercury commenced following the introduction of the second instrument, the shutters were altered so that they could be narrowed down to prevent disturbances to the surface of the mercury by strong currents of air. They were further altered in 1841/2 to make them easier to use.
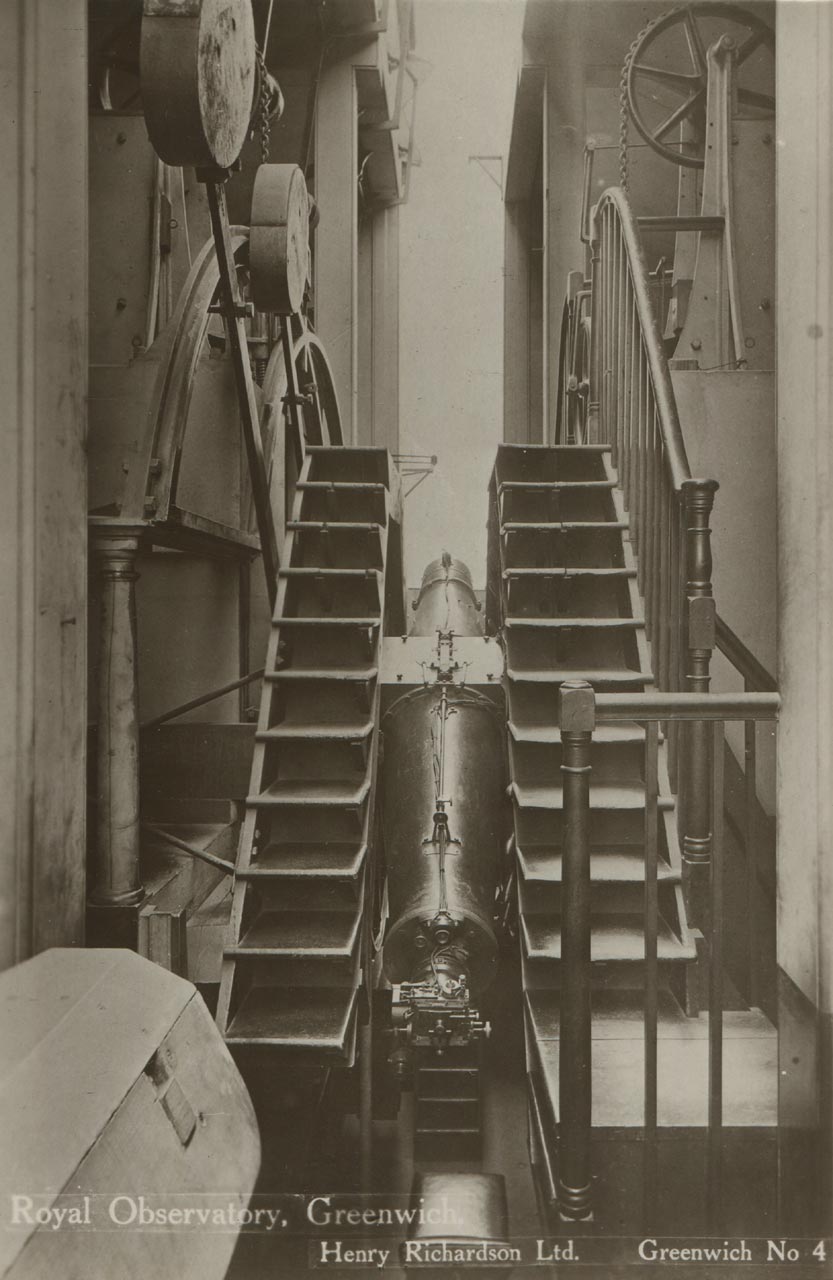
The Airy Transit Circle in about 1920. From a postcard published by Henry Richardson
The Circle Room (left) and Transit Room (right) in 1839, as viewed from the north. (Detail from an image above)
The same rooms after conversion: the Transit Circle Room on the left and the Astronomer Royal's Official Room on the right. (Detail from an image below)
Plan of the Transit Room (left) and Circle Room (right) in 1847 before they were converted
The same rooms in 1863. Key: (c) Astronomer Royal's Official Room. (d) Transit Circle Room. (4) passage carved off from old Transit Room. (5) Reflex Zenith Tube Room (erected in1855)
The Meridian Building c.1850 showing the recently completed Transit Circle Room. The semi-circular dome to the left housed the Sheepshanks Equatorial, whilst the drum dome to the right housed Airy's Altazimuth. From London and its Vicinity exhibited in 1851, (John Wheale, London, 1851)

The Chronometer Room created from the Astronomer Royal's former office in 1898/9. The photo was taken looking southwards. The fireplace and flue in the corner on the right was added for Chrisite in 1887/8. Photograph by C Pilkington. From The Graphic (30 August 1902)
Airy’s Reflex Zenith Tube and a problem with vibrations
In the late 1840s while Airy was working up his proposals for the new Transit Circle, his thoughts had also turned to a replacement for the 25-foot Great Zenith Tube in Flamsteed House – a telescope that had proved unsatisfactory partly because of its location, and partly because of its design. For the new instrument Airy, settled on a cupboard sized room that jutted out from the north east corner of the then Circle Room (the soon to be Transit Circle Room). Although the room appears to have been built as a single story onto the existing buildings between 1813 and 1831, its origins and original purpose are obscure. The 1831 plan shows that at that time, it could only be accessed from the outside, suggesting it might have been designed as a refuge for the porters whose job was to admit visitors to and from the courtyard. By 1846, it was also accessible from the Circle Room, suggesting that its function was now that of a lobby. Unfortunately for Airy, after conversion the room turned out to be unsatisfactory for a reason that he had failed to anticipate.
The replacement zenith telescope was of Airy’s own design and made use of reflected images of the stars from a tray of mercury. The walls of the room were raised, and a flap shutter mounted on the roof. The floor on which the instrument was carried was raised about five feet above that of the Transit-Circle Room, and a pier carrying the mercury-trough built on a pyramidal stove-flue below it. It was the mercury that was to prove the locations undoing. Every time the adjacent courtyard gates were opened or shut, a jarring of the mercury would result. In 1853/4, Airy decided that a new room for the telescope should be constructed on the other side of the building in the recently created angle between the Transit Circle Room and the passageway behind his Official Room. Funding was not immediately forthcoming and it took until 1855 for the extension to be erected.
The mercury trough was supported on a box of dry sand resting on the ground. But the mercury suffered from an intolerably large and never ceasing tremor. A well was therefore dug below the telescope and a stage erected at its bottom to support the trough of mercury. When no diminution in the tremor was observed, the well was dug deeper and deeper, and the support stage for the mercury trough adjusted accordingly. Digging was eventually stopped when, with the problems still unresolved, the well had reached a depth of ten feet – some seven feet below the building’s foundations.
It had by then been realised that the vibration problem was a result of the very structure of the hill itself, its compacted mix of sand and pebbles leading to the ready transmission of vibrations and tremors. The problem of transmitted vibrations does not appear to have affected the mercury troughs that began to be used with the Mural Circles in 1822, but did have serious implications for the Observatory in later years as the railways were extended and Greenwich Power Station was built nearby. The problem of the transmitted vibrations as they affected the Reflex Zenith Tube was mitigated by backfilling the well with ‘incoherent rubbish’ and suspending the mercury trough on a rather more complex arrangement of staging. This however was not the end of the problems with the design of the room. As originally built, the window (which was in the west wall), did not open. Those tasked with using the telescope were of the opinion that the star images would be rendered better if the ventilation in the room was improved. The window was accordingly altered in 1857/8. Given what is now know about the poisonous nature of mercury vapour, there was undoubtedly a beneficial effect on the health of the observers too! Although not used after 1910, the Reflex Zenith Tube remained in place until April 1923 when it was dismantled and placed in the Case O of the Observatory’s museum in the basement of the South Building, the room being converted into a paper store (RGO39/4/5). In 1939/40, a concrete housing for a new time desk and terminal frame (presumably for the new quartz clocks) was erected on the west side of the former Zenith Tube Room on the site of the cold greenhouse, a new greenhouse being erected immediately to the south of its former position. The cold greenhouse had previously been rebuilt in 1908, having originally been erected sometime between 1863 and 1880. As originally built, it was a wedge shaped lean-to. Meanwhile, the original room commandeered for the Reflex Zenith tube appears to have been used as a store until 1914/15 when it was knocked into the small room immediately to its south that had been previously used by the porters (as a lamp lobby?), and used to house the Transit Circle Chronograph which was moved there from the other side of the courtyard.
The Wireless Room
Moving eastwards along the Meridian Building the first floor room under the Sheepshanks Dome that had become Library 2 back in 1851 had ceased to have that function by 1899 when the whole of the Observatory’s library was re-housed in the New Physical Building. In 1911/12 with pressure on space for the records still increasing, the U-shaped staircase between the record rooms was removed and a new entrance made into the Upper Record Room from former Library 1, the space freed up, being appropriated for additional shelves. At the same time, the heating system was changed to one with water fed radiators – something that would presumably have required valuable wall space. The three south facing windows of the Lower Record Room are known to have been bricked up at some point. It seems likely that this was done at the same time. In the final configuration of shelving, the banks of shelves in the Upper Record room all ran from north to south. There were four evenly spaced sets in total: two along the east and west walls, and two double-sided freestanding sets across the middle. The new entry door was in the north-west corner. Former Library 2 was appropriated in 1913 by Dyson for the reception or wireless time-signals from the Eiffel Tower in Paris and Norddeich, a small town on the German coast. The receiving apparatus was set up on 5 July that year. The Wireless Room as it became known was moved in 1931/2 to the larger room next door (former Library 1); with the room it vacated becoming a store for stationary. Downstairs, the room that had been given over to the East Depôt in 1854 was assigned for use by the computers in 1869/70. Within the next few years, the room occupied by the Chief Assistants was swapped over with the smaller one next door that had been assigned to the rest of the Assistants.
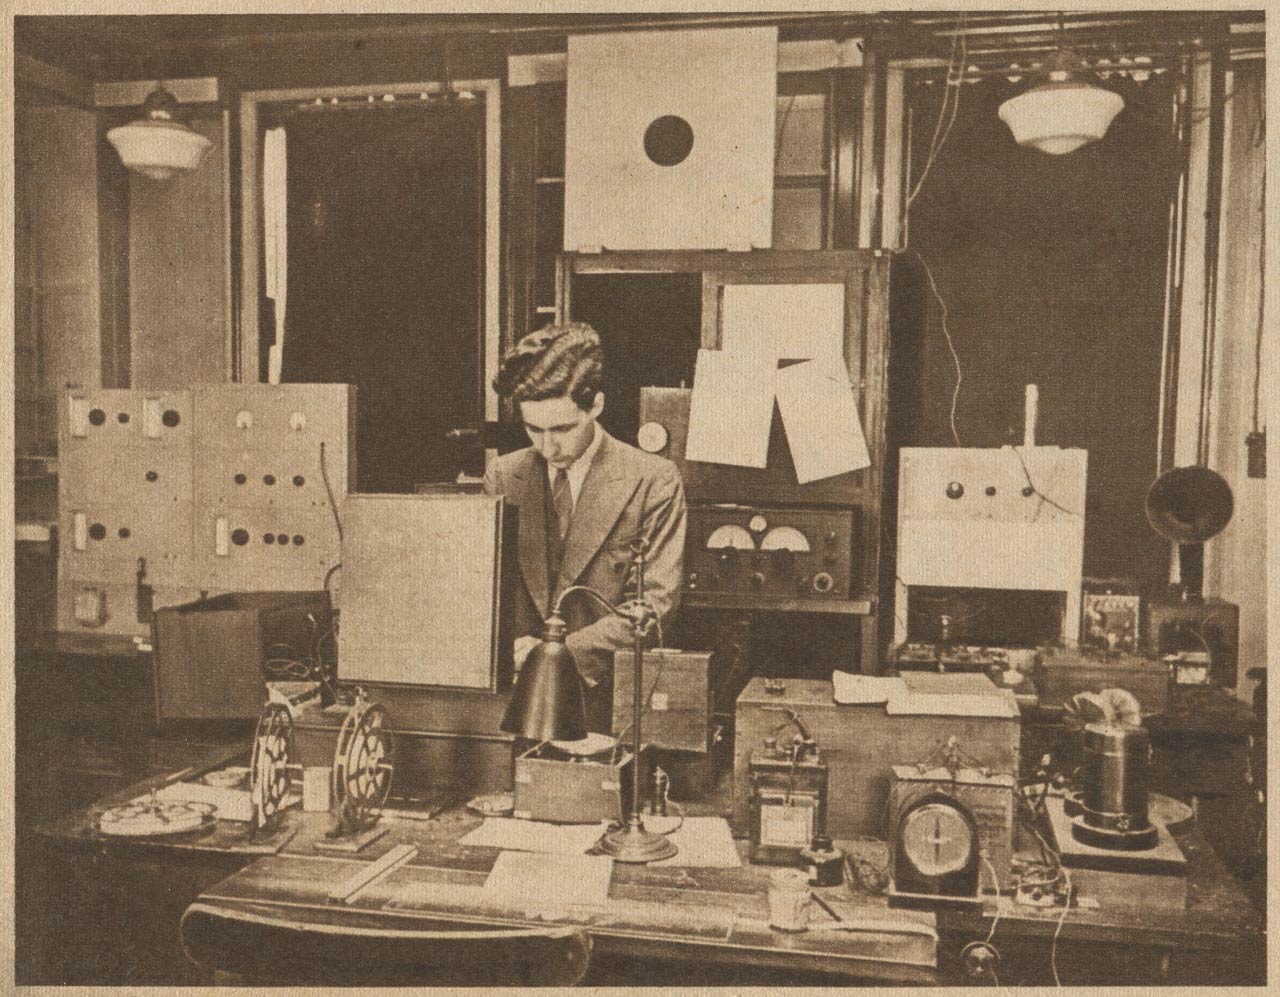
Humphry Smith in the Wireless Room c.1939. From the 24 February 1946 edition of Le Patriote Illustré
The work ethic, privacy and artificial lighting
Privacy for his family together with minimising possible distractions for the workforce seems to have guided the detailing of many of the changes that Airy made to the building and the spaces immediately outside it. Airy was the first of the Astronomers Royal to have a large family. His arrival in 1835 followed a period of recent expansion that had seen the number of assistants increase from two who lived in, to six who now all lived out. The Meridian Building was their main place of work, but it stood surrounded by the private gardens and grounds of the Astronomer Royal. As we have already seen, one of Airy’s first actions was to relocate the staff toilet from the Upper Garden to a new site that could be accessed from within the building. The ground floor windows in the Meridian Building were of a height that originally allowed a view out while working at a desk. But over time, the view from them to the north over the courtyard became increasingly obscured by shrubbery. The shrubs were removed and replaced by a fence when the covered way was extended along the frontage of the building in 1857/8. On the other side of the building, the window in the extension built for the Reflex Zenith Tube had its window facing sideways to the west rather than outwards to the south, though this was probably more to do with preventing the heating of the instrument by the sun. Having said that, the lean-to greenhouse which was built afterwards, partially obstructed the view from both the Zenith Tube window and the windows of the Passage Room. In the Computing Room, to the west, the lower panes are known to have been of obscured glass, although the date of their insertion is uncertain. To the east, the south facing room allocated to the assistants as a common room looked out not onto the private Middle Garden, but on to the less private (former) Drying Ground that was screened off from it to the east. The Altazimuth Dome was originally built with no windows although as we have already seen windows were later added in the south and east walls for ventilation purposes in the 1860s.
With Christie’s arrival in 1881, his plans to expand the work of the Observatory took priority over any needs of his wife or his family. The erection of huts in the Courtyard for telegraphic determinations of longitude, the removal of the fencing along the covered way, together with the extension of the upper computing room and the building of the Astrographic Dome all reduced the privacy of his family. Indeed, the new rooms in the Meridian Building gave a view across what had until then, been the completely private Upper Garden that backed onto Flamsteed House – a view that had been unseen from the Meridian Building since Maskelyne blocked the west window over 100 years before. The issue of privacy was less important for Christie than Airy, partly because Christie had no daughters and partly because his wife died in 1888 and he never remarried.
Water, gas, electricity and mains drainage.
The Observatory was connected to the water main in 1820 and the gas main in 1850, gas illumination being introduced in all the buildings and on all the instruments, as far as Airy thought desirable to employ it. Mains drainage was connected in 1884. A telephone for communication between the Astronomer Royal’s Official Room and the magnetic observatory together with a speaking tube between the upper and lower computing rooms were installed in 1885/6. In 1893/4 a gas fired electrical generator was installed in the basement of the recently completed south wing of the New Physical Building. The site was later connected to the electric mains and the generator removed in 1912/13. The electrical lighting supply was originally 110V, but was altered to 240V on 17 November 1921.
World War 2
The Meridian Building was unscathed by World War 1. In the run up to World War 2, defensive moves were made to protect the chronometers, the time service and the manuscripts and other valuables. The windows in the Great Equatorial Building were bricked up to protect the chronometers, ands it was presumably at this time that the remaining windows of the lower record room were bricked up too. In addition, a blast wall was built in front of the window where the old time desk stood in the lower computing room.
At the outbreak of war, many of the younger staff signed up. Those departments deemed essential to the war effort were evacuated: the Nautical Almanac Office to Bath, the chronometer service first to Bristol and then Bradford on Avon and the time service to Abinger where it operated from the already existing magnetic Observatory. The Meridian Building was not hit directly, but damage was caused to the ceilings, windows and the Sheepshanks Dome by the blast from bombs that fell nearby – particularly one that struck the main gates on 15 October 1940. After the war, the observatory staff remained depleted and scattered. The location for the Observatory’s new permanent home that had been under consideration before the war had started was finally settled and a strategic decision made about what resources to expend on the Greenwich site. Of the large telescopes, only the Astrographic and Yapp were brought back into use. Other telescopes in use were the Photoheliograph, which had remained in use throughout the war and the Airy Transit Circle (which was out of action between September 1940 and May 1942) and a small reversible transit. The evacuated departments never returned to Greenwich, moving instead straight to the new site at Herstmonceux as accommodation was completed to house them.
Some members of the time department did however return to Greenwich to set up a reserve time service as a replacement for the one that had been operating from Edinburgh. In 1947/8, following the installation of a new ceiling and redecoration, the Upper Computing Room was made into a control room for the Observatory’s quartz clocks. The rest of the ceilings and damaged plasterwork in the Meridian Building had been repaired by the following year, but not all the windows. One particular concern was the old Altazimuth Dome. Structural problems had already been identified before the war. In 1935/6, the covering of the rotating dome had had to be replaced and new wooden formers fitted. Then in 1938/9, parts of the cornice surrounding the dome were found to have become dangerous, and were removed pending repairs. In 1948/9, ‘a dangerous weakness’ was found that was remedied by removing the coping and rendering the walls.
Conversion to a museum
Even before it had been announced that the Observatory would be moving to Herstmonceux, various parties began to position themselves regarding the future use of the site and historic instruments. Although the parties didn’t necessarily know it at the time, under the terms of the Royal Warrants by which the Observatory operated, the Admiralty who were responsible for the site, only had a right to use the land for the purposes of the Observatory or the Astronomer Royal. If and when such use ended, the buildings and land were to revert to the management of the Ministry of Works (by virtue of section 22 of the Crown Lands Act 1851).
The Admiralty was keen to use Flamsteed House as temporary accommodation for some of its officers stationed at the nearby Royal Naval College. The Ministry of Works (MOW) was keen to use it in the short term to house one of their park-keepers rather than repair one of their dilapidated lodges. The Science Museum had eyed up the redundant instruments with a view to acquiring them and the buildings as an annex of its main site. The National Maritime Museum (NMM) had eyed it up too, and on and off though the war, its director Geoffrey Callender was engaged in informal talks with the Astronomer Royal, Spencer Jones. For his part – although he had no direct say in the matter – Spencer Jones was keen to see the northern part of the site preserved (the part that today’s visitors are charged to enter) and become a museum of Astronomy and Navigation under the management of the National Maritime Museum. The Observatory’s Board of Visitors passed a formal resolution to this effect at their meeting in June 1950 after which it was also agreed by the Board of Trustees of the National Maritime Museum. After referring the matter to the Standing Commission on Museums and Art Galleries, the Treasury authorised the use of the buildings as a Museum of Navigation and Astronomy under the charge of the NMM on 19 January 1952. On 13 July 1953, a new Royal Warrant (Work 17/782) was issued detailing which parts of the Greenwich site would be occupied and operated by the Museum, and which parts would be reabsorbed into the Park. Those parts that were to move into the care of the Museum included the whole of the Meridian Building together with the neighbouring Great Equatorial Building, but none of the land or buildings to their immediate south.
The whole project, particularly with regard to the Meridian Building was dogged by animosity between the Admiralty and the MOW and poor communication between the MOW and the NMM. In the case of the later two, each was guilty of pushing their plans forward without bothering to consult with the other. Of particular concern to the Ministry were the plans that the Museum were found to be developing for buildings on the south part of the site to which they had no legal right.
In the post war years, money was in short supply and only rudimentary repairs were carried out by the Admiralty prior to the Greenwich site being evacuated by the astronomers. The last of those left in 1958 and the Meridian Building was handed over to the MOW to whom responsibility for refurbishing it now fell. It was described in late 1959 as being in an extremely dilapidated state with leaking roofs and several serious outbreaks of dry rot, the worst of these being in the Transit Circle Room where the last observation had been taken on 30 March 1954. How the building came to be in such a state is unclear. It seems to have deteriorated in the final years of occupation by the astronomers perhaps in part because of a lack of interest in the Greenwich site by Woolley who took over as Astronomer Royal at the start of 1956. Plans were drawn up to demolish the upper stories of the two domes at the western end (the Astrographic and Airy’s Altazimuth) which were deemed of no architectural or historic merit and to restore the rest of the building ‘to as near its original appearance as possible’. Following the discovery that the dry rot was more extensive than originally thought (and therefore more expensive to put right), two alternative schemes were proposed in 1960 – either to restore the building as originally envisaged (option 1), or to demolish the eastern end of the range beyond Airy’s Transit Circle where the dry rot was particularly bad, and replace it with new double height gallery that would link the Meridian building directly with the Great Equatorial Building (option 2). The later option was favoured by Director of the NMM and Prince Philip who was one of the trustees.
When the costings were done on the two options, it was found that option 2 with the link building was not going to be cheaper than the original option and both were going to cost about £40000. There was not insufficient money in the 1960/61 budget to cover this. It was therefore proposed to do the work in two stages. To restore the western end of the range and demolish the eastern end, with the link building being built at a later stage as funding allowed.
The Museum was not happy with this as they felt that some sort of link building was necessary both from a visual point of view and for access to the toilets which at that point it was planned to build on the ground floor of the neighbouring Great Equatorial Building. So instead of a link building, the idea of a temporary link corridor was developed, and in September agreement was reached on its design.
… to be continued.
Image licensing
The image marked © BT Heritage, has been obtained from The BT Digital Archives and is reproduced under the terms of a Creative Commons Attribution-Non-Commercial-ShareAlike (CC BY-NC-SA) licence. It has been adjusted for contrast and is more compressed than the original.
The paintings by Henrietta Smythe are reproduced by kind permission of The Scout Association Heritage Collection. Henrietta Grace Smythe (1824–1914) was the sixth of eleven children born to Captain (later Admiral) William Henry Smythe (1788–1865), a distinguished astronomer, fellow of the Royal Society and a member of the Observatory’s Board of Visitors from 1836 until his death. One of Henrietta’s two older brothers, Charles Piazzi Smyth (1819-1900), became Astronomer Royal for Scotland in 1846. The other, Warrington Wilkinson Smythe (1817–90), married Anna Storey Maskelyne, granddaughter of the fifth Astronomer Royal Nevil Maskelyne. In 1846, Henrietta married Baden Powell, the Savilian Professor of Geometry at Oxford who was 28 years her senior and previously twice married. Widowed in 1860 shortly after the birth of her tenth child, she changed the family name to Baden-Powell. Her son Robert was the founder of the Scout Movement.
© 2014 – 2026 Graham Dolan
Except where indicated, all text and images are the copyright of Graham Dolan